Switch your outbound caller ID to different local numbers with the Sonar portal and free Chrome extension. If you'd like to set up different Outbound Caller IDs for your click-to-dial extension, please refer to the Chrome Extension - Click-to-Dial.
Only Office Managers Can Add Caller ID Numbers
Before an organization can leverage the local calling feature, Office Manager must configure Caller ID numbers within the secure Account Preferences portal.
All Sonar users can use the net2phone Canada Chrome click-to-dial extension to switch their outbound caller ID once local numbers have been configured.
Outbound Caller ID Benefits
Benefits of Using Local Caller IDs
Utilizing local caller IDs can provide several benefits for net2phone Canada:
Increased Answer Rates
Customers are more likely to answer calls from local numbers that they recognize; local numbers create a sense of familiarity and trust, leading to higher call pick-up rates.
Enhanced Trust and Credibility
When customers see a local number, they are more likely to perceive the company as being established and invested in their community.
Improved Customer Engagement
By using local caller IDs, net2phone Canada can foster a stronger connection with customers, improving customer engagement and satisfaction as customers feel more comfortable interacting with a local business.
Targeted Marketing Campaigns
Local caller IDs can be used to target specific geographic locations, allowing net2phone Canada to tailor marketing campaigns and promotions to different regions.
Improved Local Presence
For businesses operating in multiple regions, using local caller IDs can help establish a local presence in each area. This can be particularly beneficial for net2phone Canada as it expands its services across different regions
How to Configure Outbound Caller ID Numbers
You must be an Office Manager in Manage Organization to access Account Preferences.

- Log in to Sonar with Office Manager credentials.
- At the top of the page (in Manage Organization), click Account Preferences.
- Reauthenticate your credentials to access the Admin portal, and click Log In.

- Click the Caller ID Numbers tab.
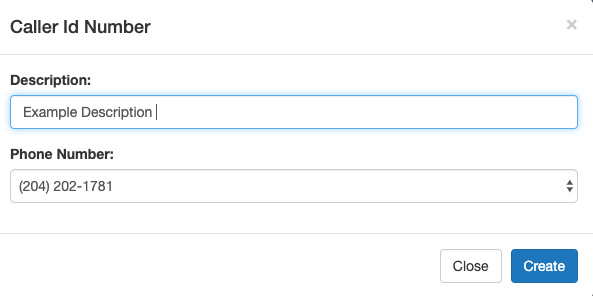
- Click Add.

- Enter a description of the Caller ID.
- Choose an available phone number from the drop-down menu.
- Click Create to save.
Update a User's Outbound Caller ID in their Profile
Once you have verified and added outbound numbers to your account, you can assign a user's outbound Caller ID number within their profile settings.
- From the Manage Organization view, navigate to the Users tab.
- Find the user you want to update and click their name.
- Open the Profile subtab within the Users tab.
- Within the Caller ID Information section, use the dropdown menu to select the outbound number from which the user wants to call.
- If necessary, update the area code.
- Click Save.

Switch Your Outbound Caller ID with Sonar's Chrome Click-to-Dial
Once you have added the number in Sonar, any user type (basic user, call center agent, call center supervisor) can select it from the Chrome Click to Dial extension.
- Click the app icon in your browser.
- Click the caller ID description below the Versature logo.
- Scroll and select the call ID you want to use as your outbound number.

