The most common user role within Sonar is called a Basic User—don't be deceived by the role title; Basic Users can access a robust feature set within the Sonar client portal. As a Basic User, you can update your own call forwarding rules, voicemail greeting, contacts, call history data, and more.
My Account for Sonar Managers
Site Managers and Office Managers can switch to My Account to manage their personal Sonar configurations. Learn more about your admin Sonar user type:
Desk Phones, Softphones, and the Mobile App
Depending on your organization’s setup, you may use one or more of our VoIP phone products. Are you unsure which devices you’re using? No need to play a guessing game; there is an easy way to check all your connected devices in the Sonar portal.
- Go to the Phones tab for a list of all your connected devices.
- Device status: A green checkmark indicates the device is online, while a red "X" indicates an offline device.
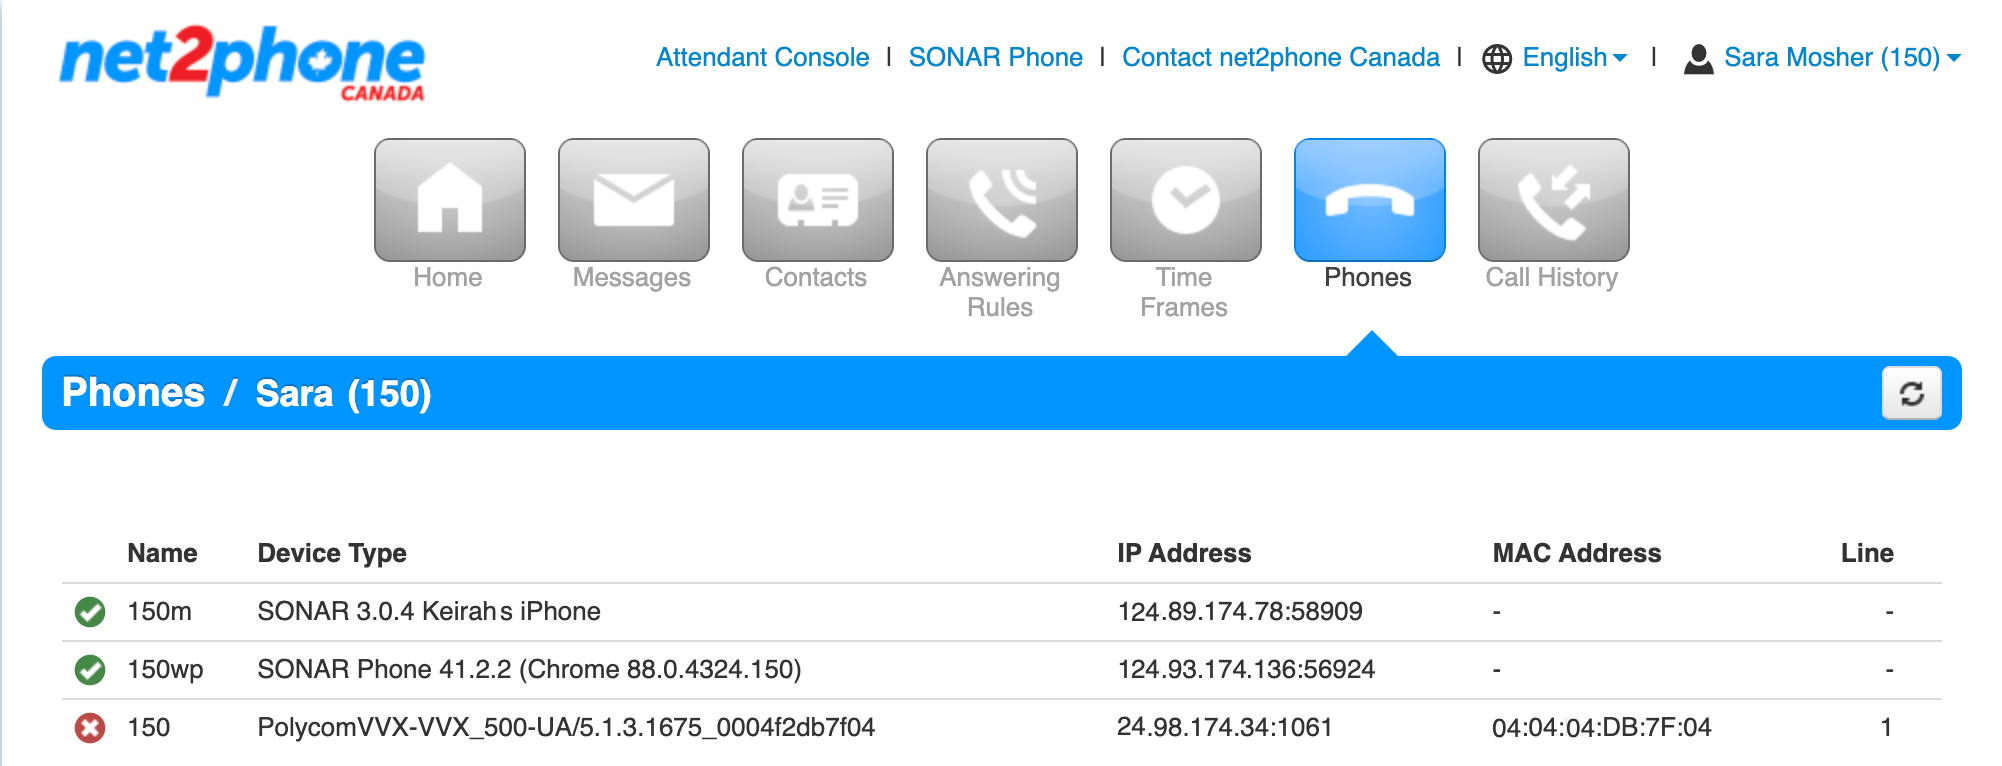
If you have multiple devices, they’ll be listed with a letter beside the extension (e.g., 200b, 200c), while your primary device will appear as only the extension number (e.g., 200).
- Mobile App: 123m
- Sonar Phone (softphone): 123wp
- Additional hard phones: 123b, 123c, 123e, etc.
Check out Identifying User Devices: Extension Numbers with Letters for a full list of device-type acronyms.
Recommended Hardware Overviews and FAQs
Once you’ve identified your devices, check out our overviews and FAQs for more information on:
Update your Profile
Update your Sonar Profile
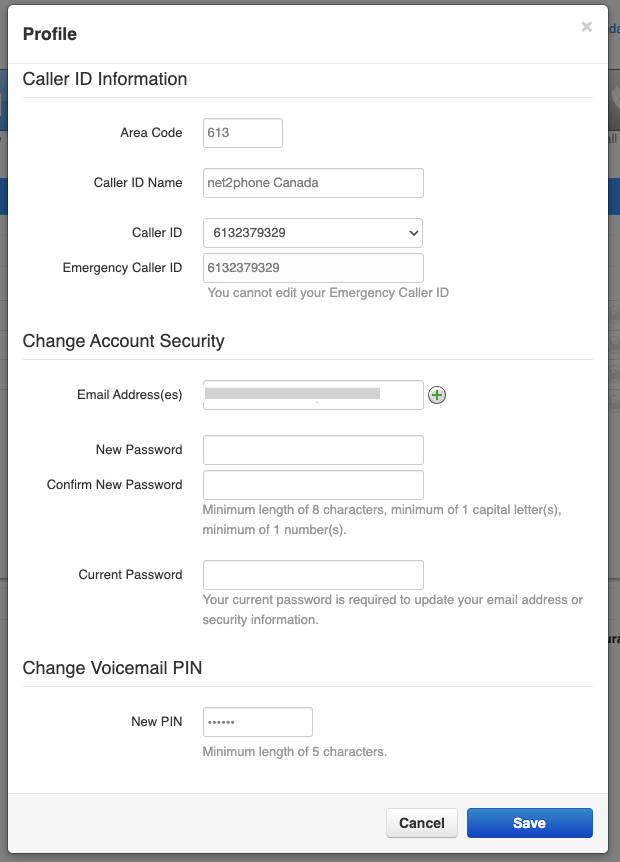
Update your name, department, timezone, email address(es), and audio directory options.
Locate Your Profile Settings
You can access your profile by clicking the drop-down menu at the top right corner. Office Managers and Call Center Supervisors must be in My Account to access these settings.

Basic Profile Options
At the top of the Profile configuration menu, you can update your:
- first name
- last name, and,
- timezone.
Directory Options
You have two options for your company directory. If you disable both options, incoming callers will not hear your name or extension number after selecting the Directory Auto Attendant option, nor will you be listed.
- Announce in Audio Directory – when enabled, your name and extension number will be announced in your company's audio directory.
- List in Directory - when enabled, you will be listed through your company directory.
Caller ID Information
You have the option to change:
- your area code, and,
- caller ID (outbound calling number).
Account Security
You can change your password. Your password must:
- be a minimum of 12 characters,
- contain at least 1 special character,
- contain at least 1 number, and
- contain at least 1 capital letter.
Change Voicemail PIN
At the bottom of the profile menu, you can change your PIN. Your PIN must:
- be only numbers,
- be non-sequential numbers,
- be non-repetitious numbers, and
- be 6 digits in length.
Always remember to Save your changes in your profile settings before leaving the window.
Update your Sonar Email Address
Your designated Sonar email address is utilized for multiple functions within the net2phone Canada Sonar system.
Sonar Email Functions
Every user can add multiple email addresses within their Sonar profile.
- Email addresses are connected to your voicemails if you have voicemail-to-email enabled.
- Email addresses are used for custom reports.
- Your email is saved in net2phone Canada's database, so our client support teams can contact you if necessary.
How to Update your Sonar Email Address
Office Managers and Call Center Supervisors must be My Account of the Sonar portal to access Profile settings.
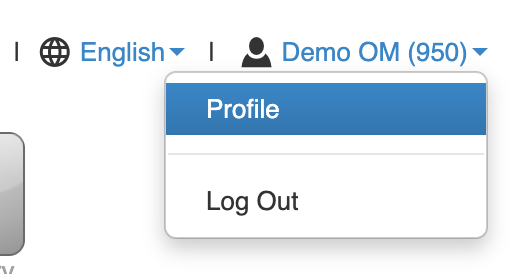
- Click your name in the upper right corner.
- Click Profile.
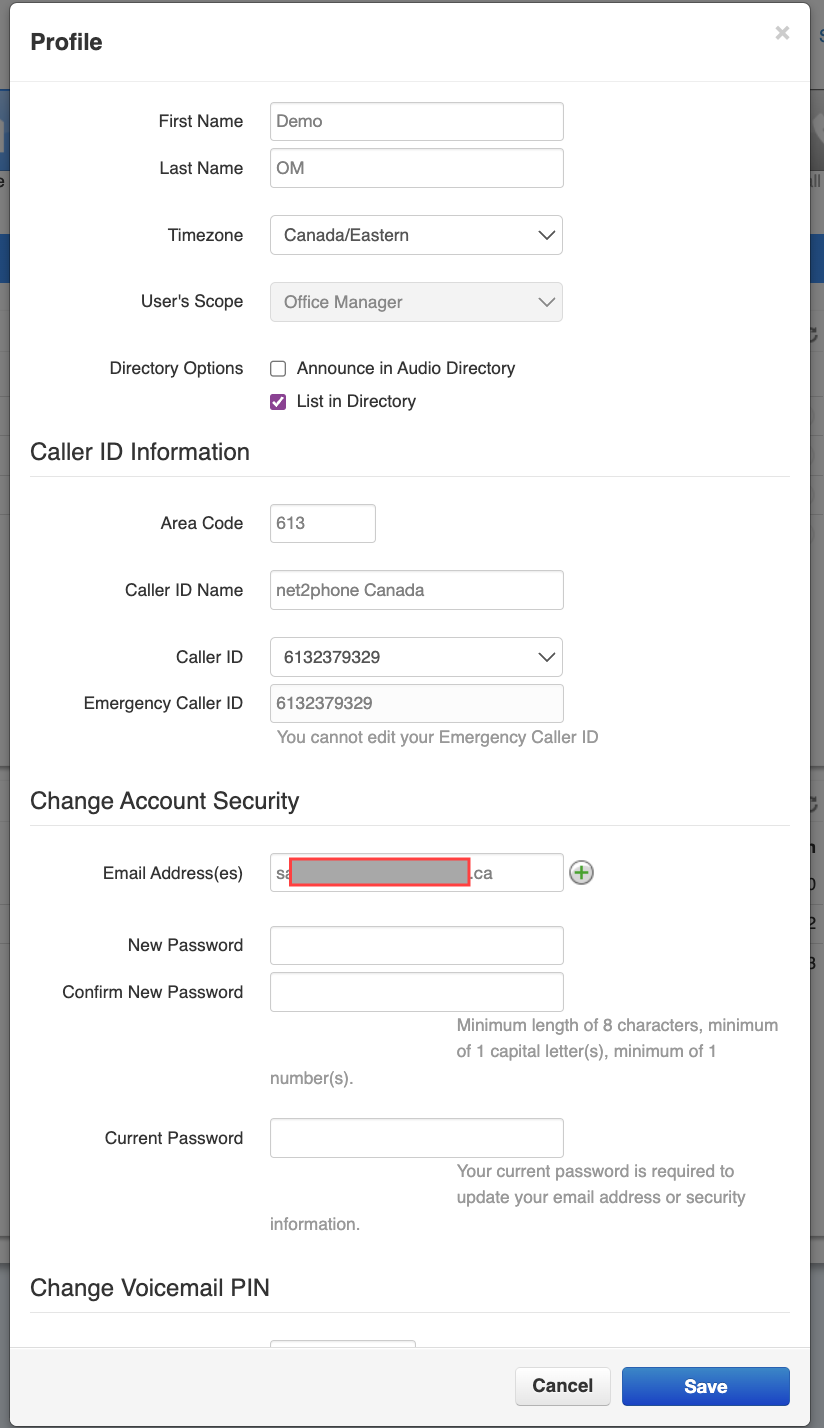
- Scroll down to find your email within the Account Security section; you can change your email address in the textbox next to Email Address(es).
- (Optional) To add a secondary email address(es), click the green plus icon.

- Click Save before closing the pop-up menu.
Sonar Home Tab
The Home section is designed to give you fast access to the most important and frequently viewed information.

There are four components of the Home section:
- New messages
- Recent call history
- Active answering rule
- Active phones
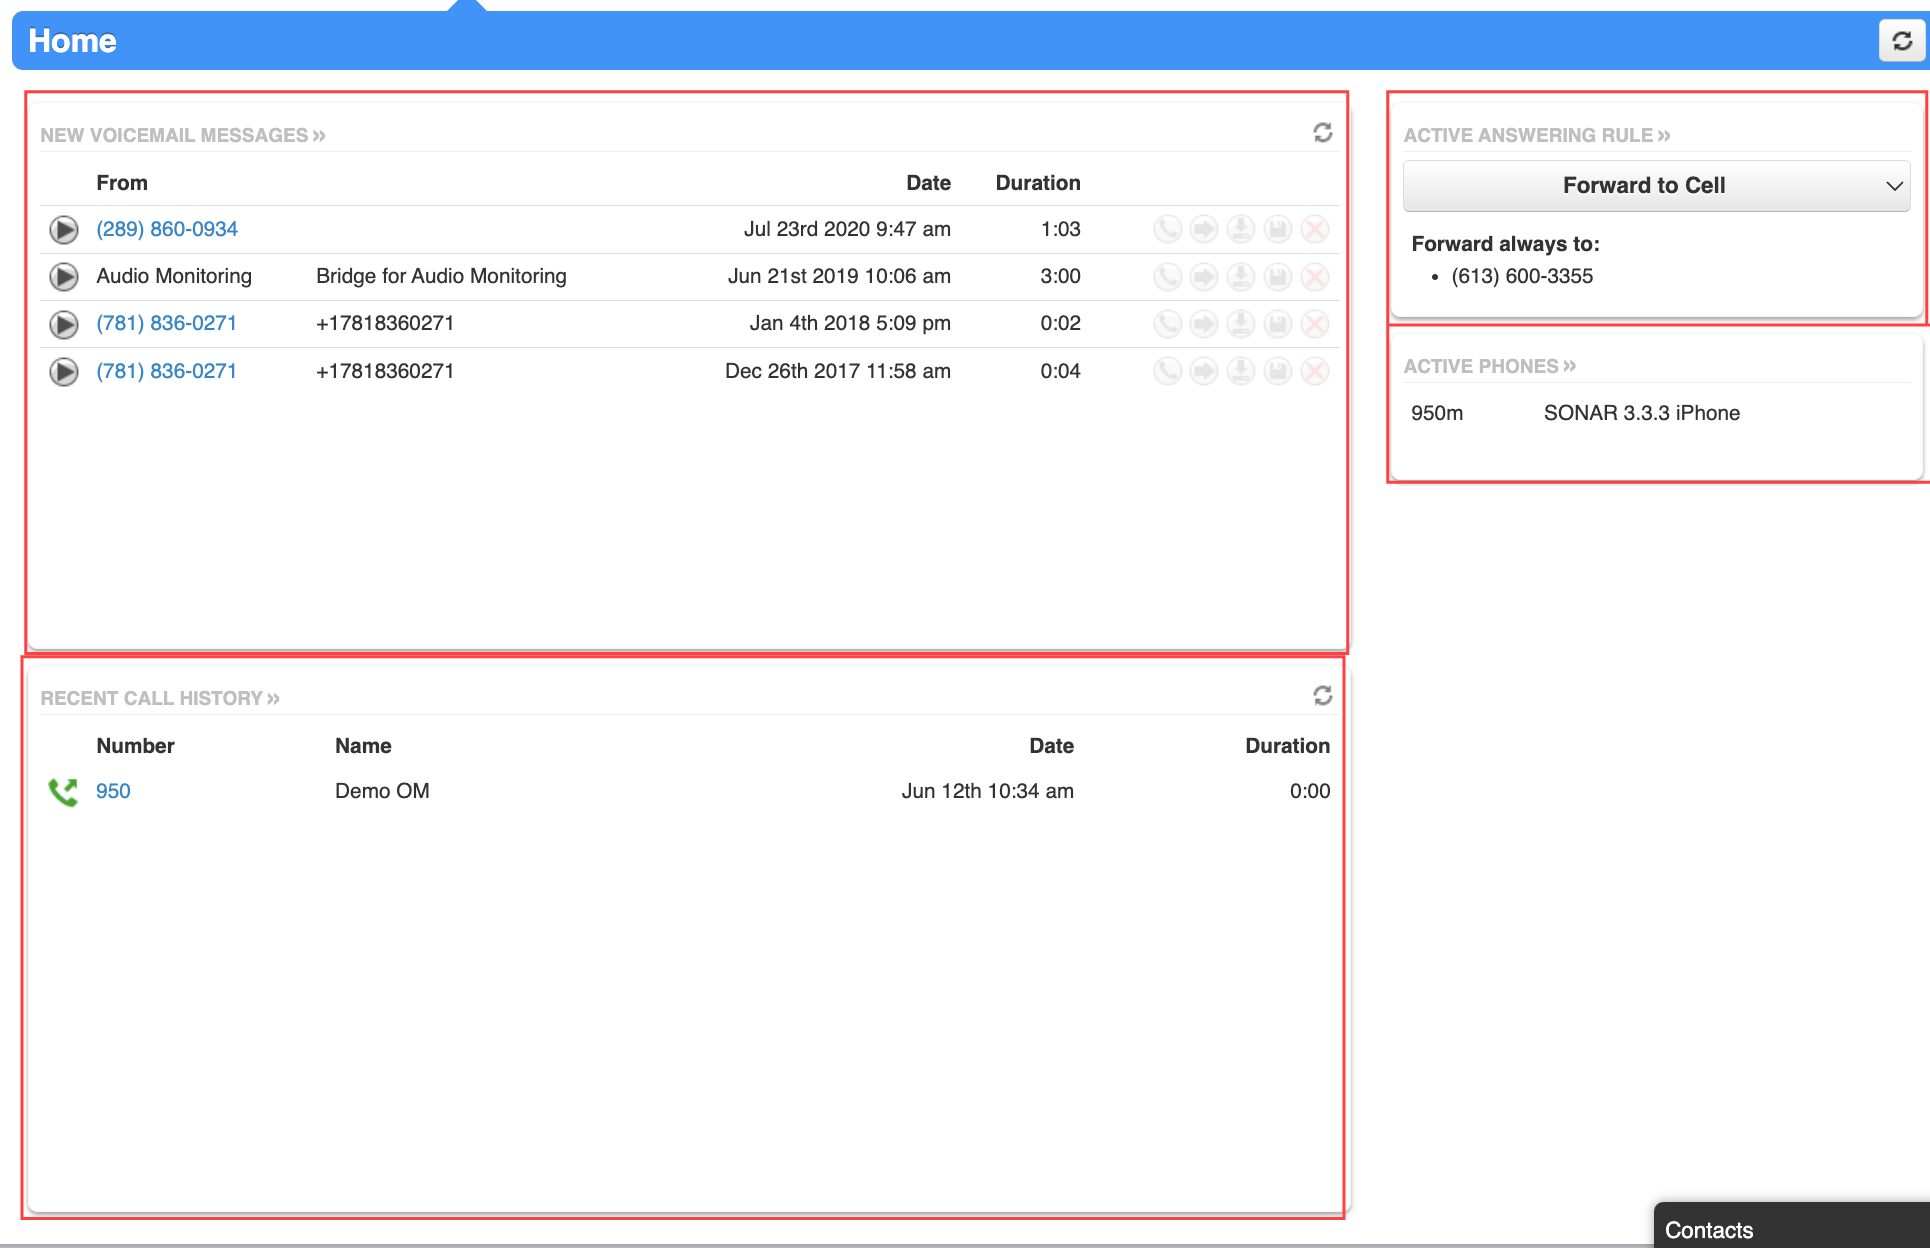
New Voicemail Messages
Voicemail messages will only display here if you do not have voicemail-to-email enabled. If your voicemails are configured to be sent to your email, this section will always display “No new messages.”
Sonar Voicemail Iconography
Within the New Voicemail Messages section, you can:
Click the Play icon to listen to your voicemail message recording from the Sonar portal.
Click the Phone icon to listen to your voicemail message recording from your desk phone.
Click the Right-pointed Arrow icon to forward your message.
Click the Down-pointed Arrow icon to download your message.
Click the Floppy Disk icon to save your message.
Click the Red X to delete your message.

Recent Call History
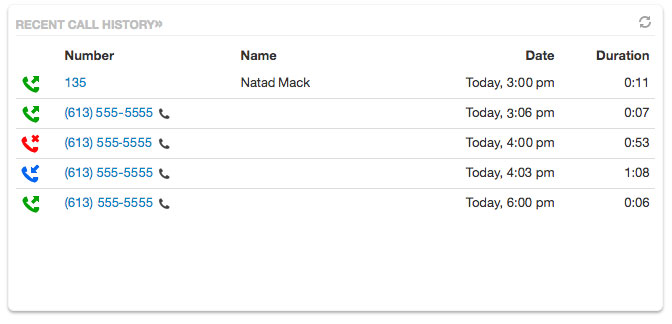
Quickly see your most recent inbound, outbound, and missed calls. Most recent calls are listed at the top.

Active Answering Rule
Easily view which Answering Rule is currently active from the Home tab of your Sonar portal. You can find this section on the right side of the page.
Answering Rule Drop-Down Menu
To change your active answering rule, click on your current active answering rule and select from any of the preconfigured rules available.
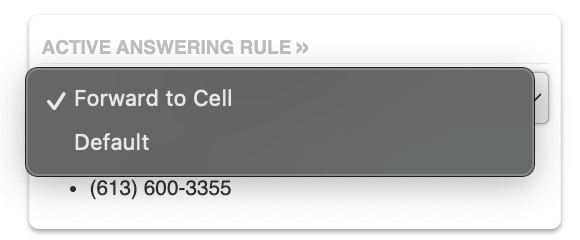
The Time Frame your active answering rule is using will be displayed under the drop-down menu.

Active Phones
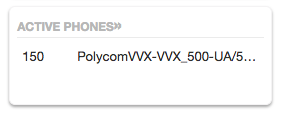
If you have multiple devices connected to your account, you can quickly see which device is currently active in this section.

Identifying User Devices: Extension Numbers with Letters
Within the Sonar portal, user devices are identified by their extension plus an alphabetic letter.
The letter codes correlate to the following:
- Mobile App = 123m
- Sonar Phone (webphone) = 123wp
- iPhone Bria = 123i
- Android Bria = 123a
- Windows Bria = 123w
- Mac Bria = 123d
- MS Teams = 123ms
- Additional hardphones = 123b, 123c, 123e etc…
Assigned desk phones are considered a user's "main device" and, therefore, do not require an alphabetic representation within the Sonar portal.
Create a Voicemail Greeting in the Messages tab
You can set up your voicemail greeting through several methods:
- Record via your desk phone.
- Upload a file in .wav or .mp3 format.
- Use the text-to-speech feature, available in both English and French.
The Messages tab also hosts your in-app SMS threads.
Create a New Voicemail Greeting
Create a New Voicemail Greeting
Creating a personal business voicemail greeting offers several benefits, enhancing your professional image and ensuring effective communication. Check out our blog: 10 Professional Voicemail Greetings for Your Business Needs, for ten script templates!
You can create a voicemail greeting in three ways:
- upload an existing .wav or .mp3 file,
- record a new greeting, and,
- use text-to-speech to generate a voicemail greeting.
Voicemail Greeting Tips!
Test your voicemail greeting by calling your own extension.
Keep it Concise
Aim for a greeting that is no longer than 20-30 seconds. Your greeting will only play once, so don’t speak too quickly and repeat any vital information that may need to be written down.
Be Clear and Direct
Clearly state your name, your business, and the purpose of the voicemail inbox.
Provide Instructions
Guide callers on what information to leave and what to expect in terms of response time.
Update Regularly
Ensure your voicemail greeting is up-to-date, especially if your availability changes frequently.
How To Upload A New Voicemail Greeting
Uploads must be in .mp3 or .wav format. Office Managers and Account Center Supervisors must be in My Account to access the Messages tab.
- Click the Messages tab in your Sonar portal.
- Click the Settings sub-tab on the left side.
- Scroll down to the Greetings section and click the speaker icon (manage) next to Voicemail Greeting.
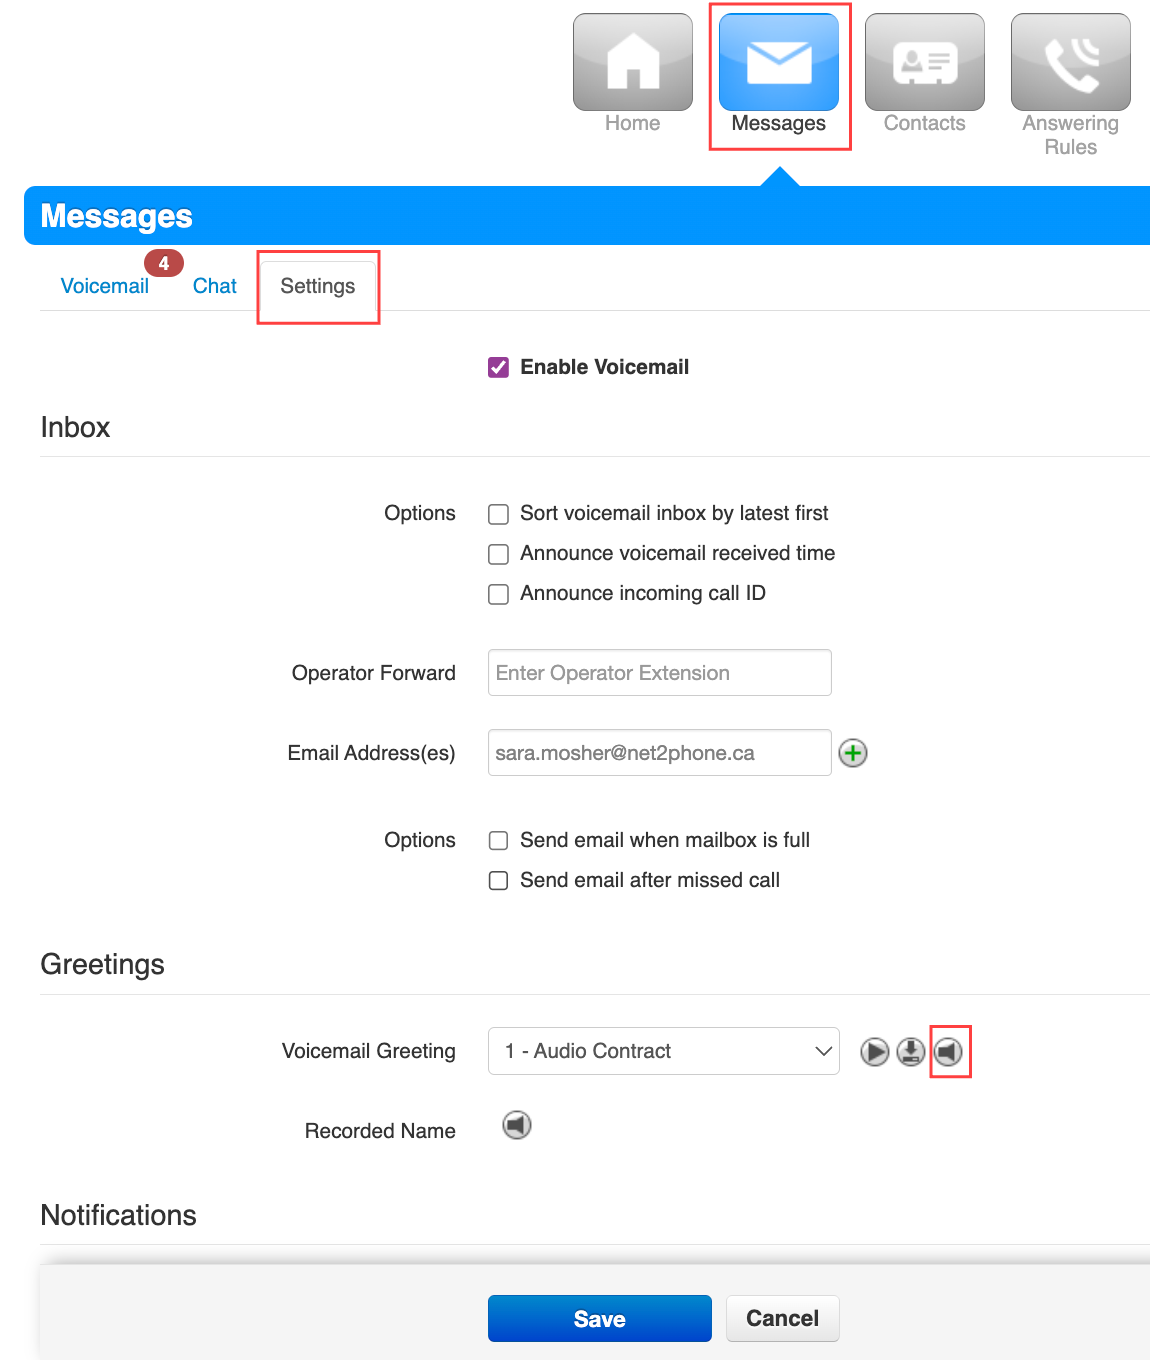
- Click Add Greeting.
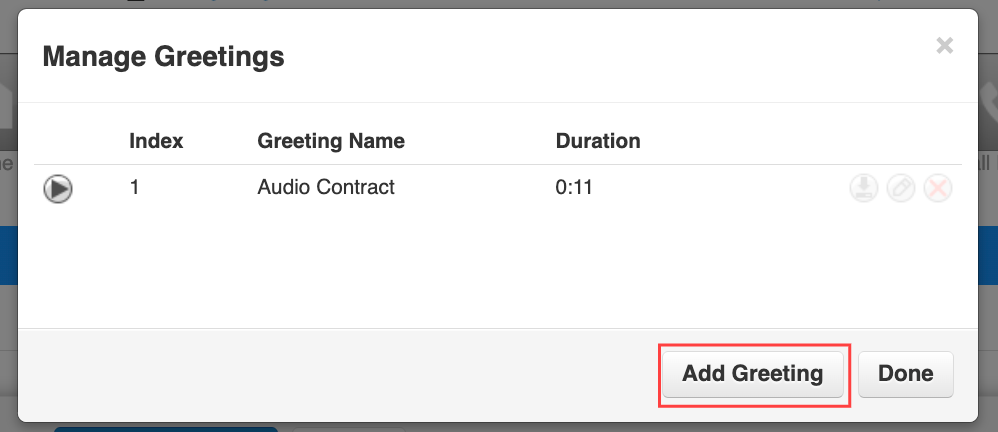
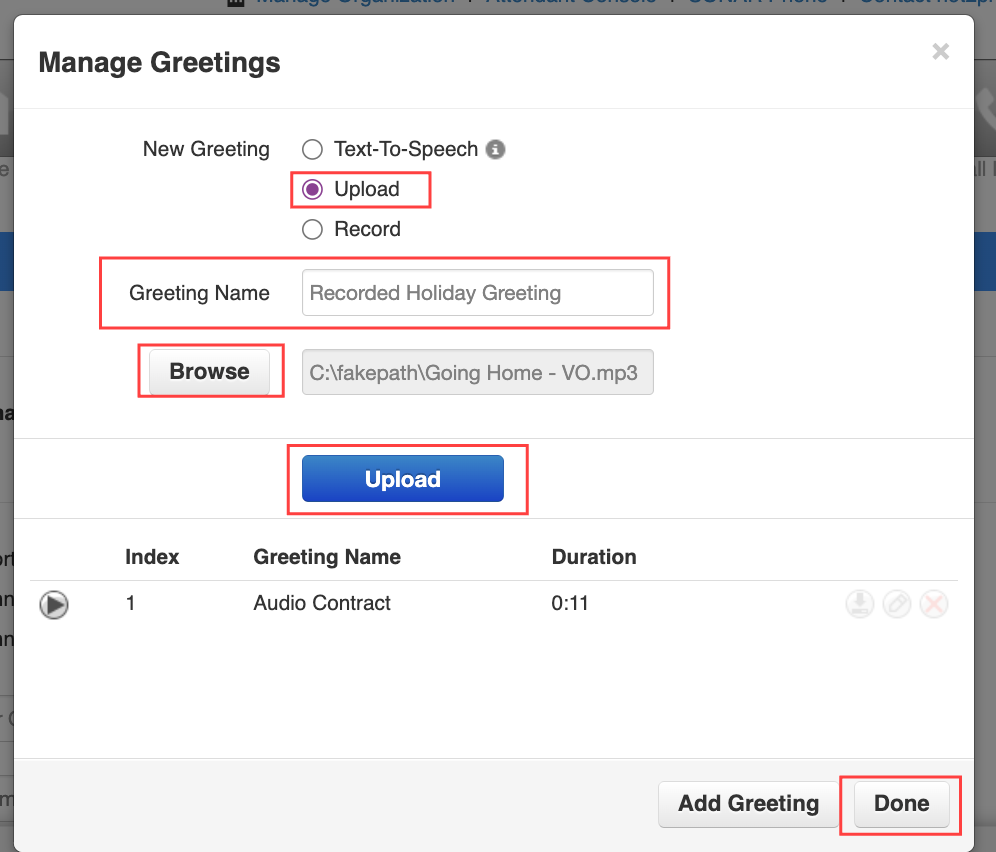
- Click the radio button for Upload.
- Name your greeting.
- Click Browse.
- Select the file you want to upload.
- Click the Upload button.
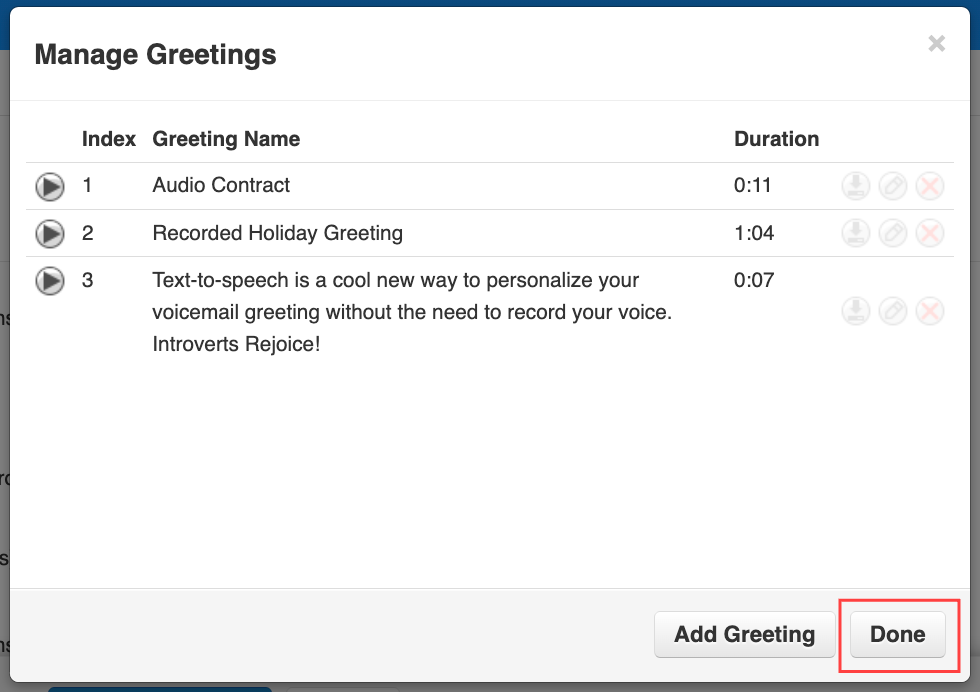
You will now see the new greeting’s index, greeting name, and duration in your greetings list. - Click Done to save.
Activate your voicemail greeting!
If you want to activate your new greeting, in the Messages, Settings section, under Greetings, click the drop-down menu and select your new greeting.

How To Record A New Voicemail Greeting
Remember that recording a message using a third-party device (such as a mobile phone) may degrade the quality.
- Click the Messages tab in your Sonar portal.
Office Managers, Site Managers, and Call Center Supervisors must be in My Account to access the Messages tab. - Click Settings on the left side.
- Scroll down to the “Greetings” section and click the speaker icon (manage) next to Voicemail Greeting.
- Click Add Greeting.
- Select the Record radio button.
- Enter the number or extension of the phone you wish to record the greeting on.
Note: If you have multiple devices, you must specify which device to call; the letters following your extension indicate the device, i.e., 101wb for the webphone/Sonar phone or 101m for the mobile app. - Name the greeting.
- Click Call and follow the instructions given to you on the phone.
- Record your message after the beep.
- Hit # to accept your new greeting.
You will now see the new greeting’s index, greeting name, and duration in your greetings list.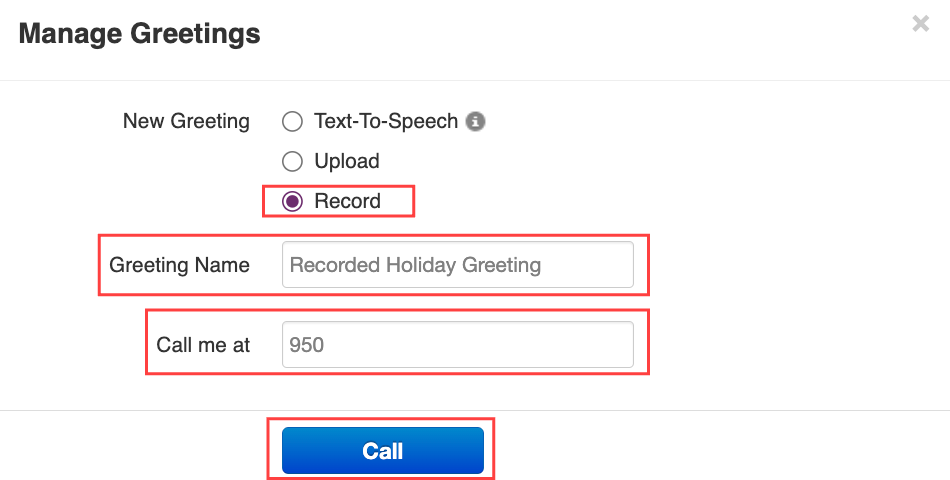
- When you are finished, click Done to save.

Activate your voicemail greeting!
If you want to activate your new greeting, in the Messages, Settings section, under Greetings, click the drop-down menu and select your new greeting.

How to Generate Text-to-Speech for Voicemail Greetings
Text-to-speech is a quick way to record new greetings. You can choose from multiple voice options, including Canadian-French!
- Click the Messages tab in your Sonar portal.
Office Managers, Site Managers, and Call Center Supervisors must be in My Account to access the Messages tab. - Click Settings on the left side.
- Scroll down to the “Greetings” section and click the speaker icon (manage) next to Voicemail Greeting.
- Click Add Greeting.
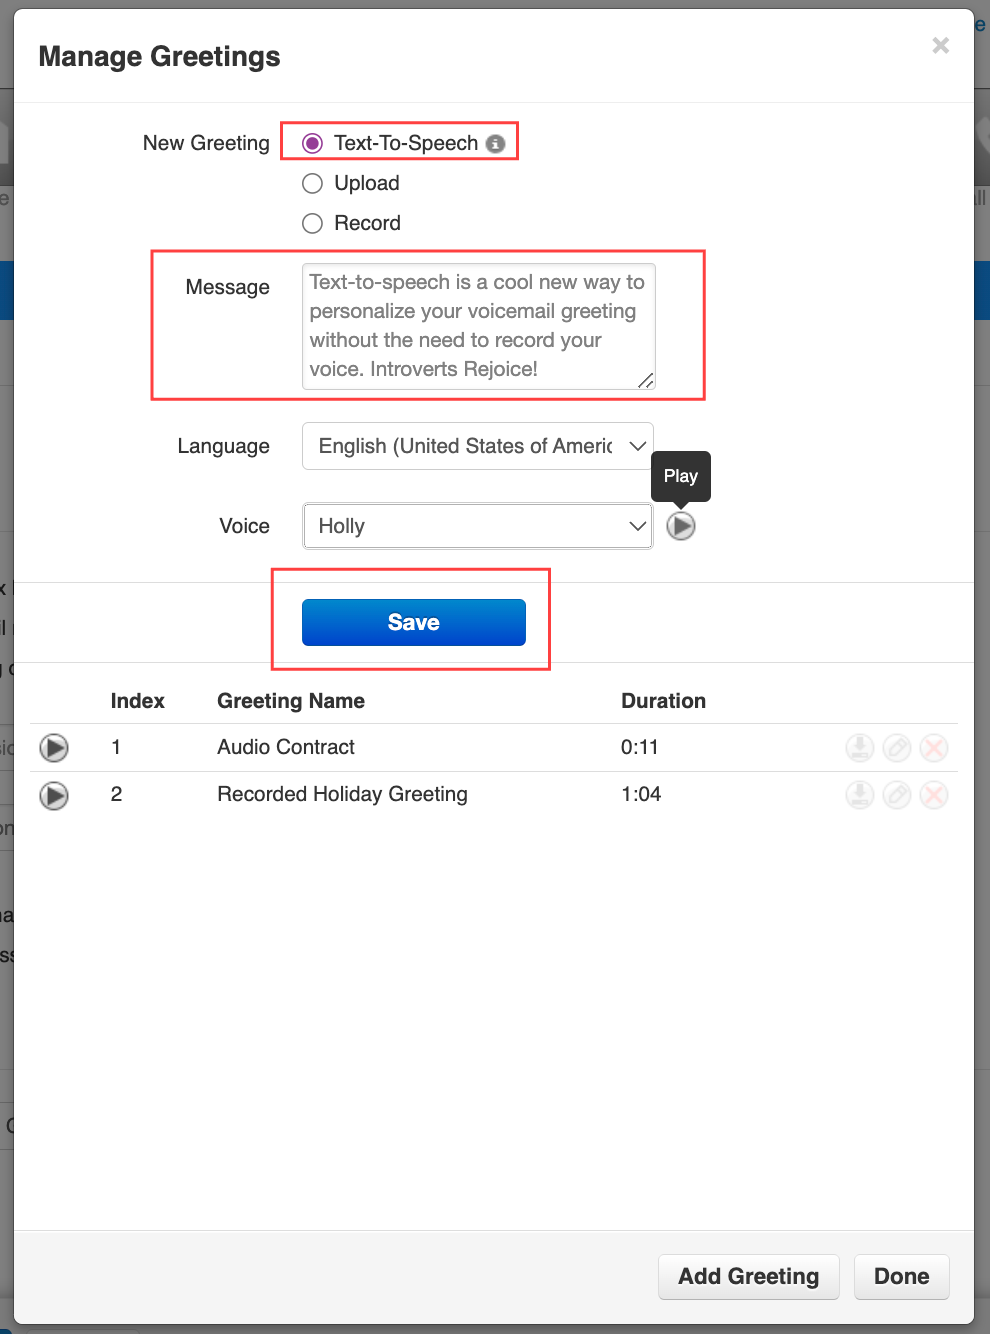
- Click the radio button for Text-to-Speech.
- Text your message in the textbox.
- (Optional) Choose English or French, and your preferred voice.
- (Optional) Click the Play button beside the voice drop-down menu to listen.
- Click Save, in the upper section of the Manage Greetings settings pop-up.
- Click Done in the lower section of the Manage Greetings settings pop-up to save.
Don't Forget to Activate your Voicemail Greeting!
Creating a New Voicemail Greeting does not automatically activate the greeting. If you want to activate your new greeting, return to the Messages tab and select your saved Greeting from the drop-down menu.

Mobile Users: Pro Tip!
If you have multiple voicemail greetings saved, you can update your active greeting from the Sonar Mobile app!
SMS in the Sonar Portal
Sonar SMS Messages
You can receive SMS messages individually, or they can be routed through a call queue to be managed by different staff members.
Sonar SMS Benefits
Leveraging external SMS messaging through your business phone system can provide significant advantages for your organization.
Send and receive messages
With the Sonar portal and mobile application, you can send and receive SMS messages to external numbers. Easily start new conversations or continue existing ones with SMS conversation history.
1 Phone Number
Whether you're calling or sending SMS messages, you can be reachable through a single phone number. You can use SMS through the mobile app!
SMS Through a Queue
Queue SMS support enables your clients and prospects to reach out via SMS for sales and support inquiries. Adapting to your client's communication preferences can boost close rates and customer retention.
Support SMS Queues
SMS is a convenient method for your on-the-go customers to receive technical support quickly and easily.
SMS Sales Queues
An SMS sales queue helps your sales representatives answer prospects' questions promptly, improving response times for simple inquiries.
Informal Conversations
SMS allows your front-line representatives to build better relationships through informal communication.
Sonar Chat
You can also use this section to chat with coworkers internally. Like SMS messages, your chats will be saved in the Messages tab.
Check out how to message coworkers with Sonar Chat.
Navigate to Messages in the Sonar Portal
Office managers and call center supervisors must be in My Account to access the Messages tab.
- Log into Sonar with your net2phone Canada credentials.
- Click the Messages tab.
- Click the Chat subtab.

Sending and Receiving SMS Messages
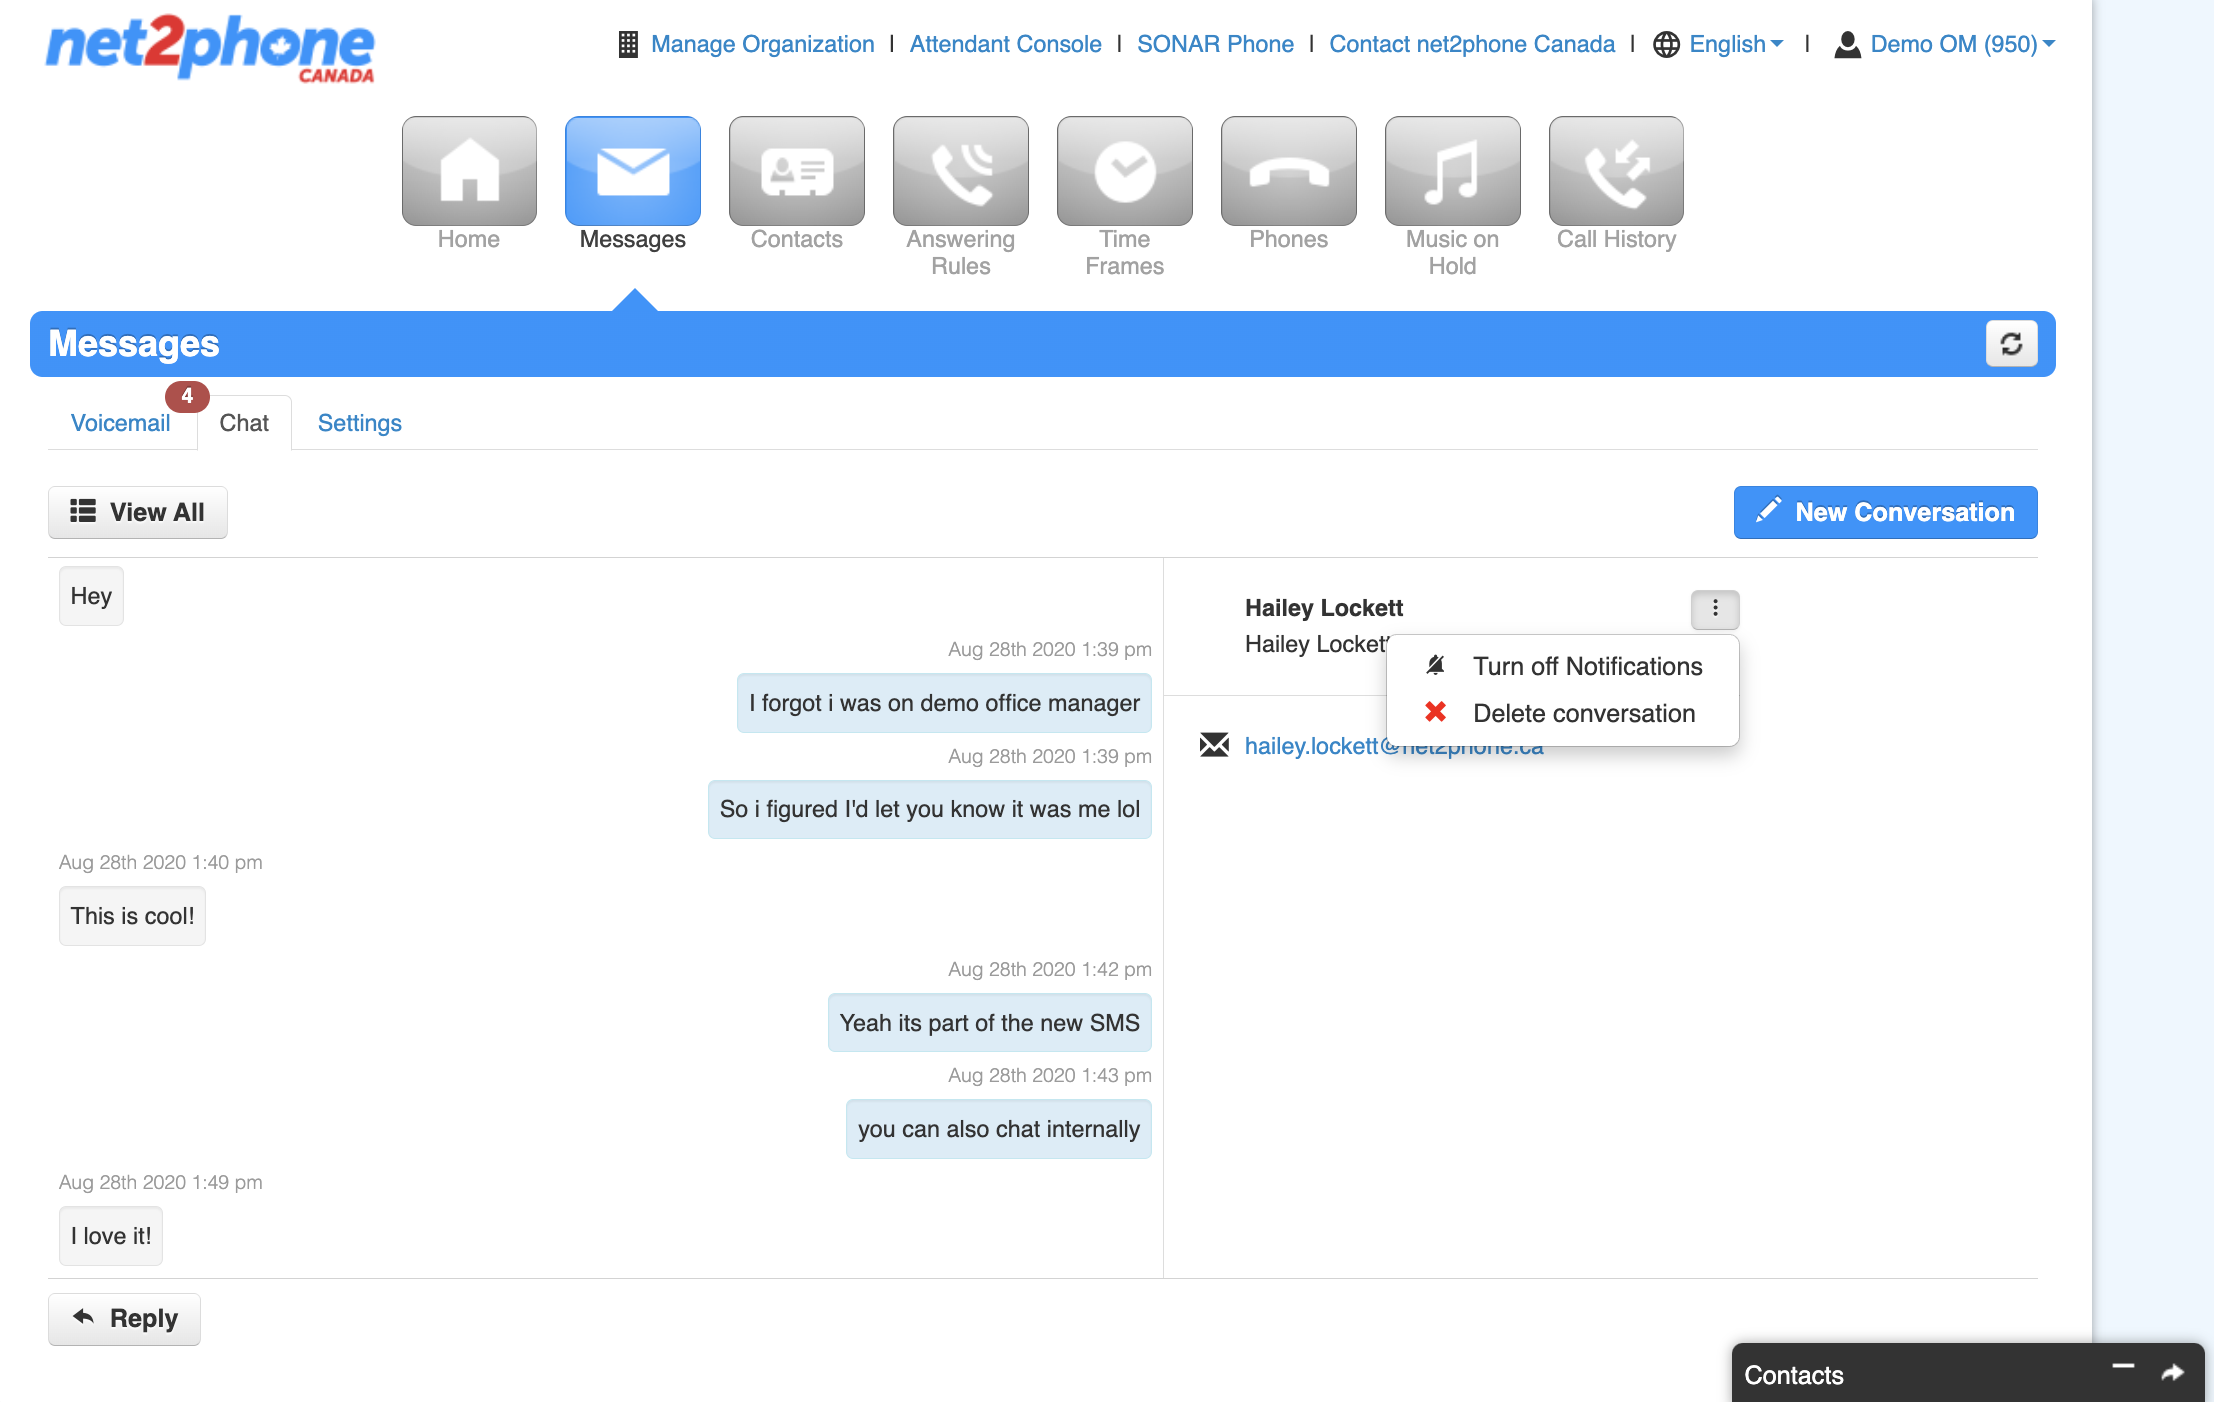
From the Messages tab, and Chat subtab, you can start new conversations and view past conversations. Your previous conversations will be saved by default. If you click a conversation to open it, you can delete the thread, reply, call the person, and choose to turn on or off incoming notifications.
Sending SMS Notes
You can start a new SMS conversation by clicking the New Conversation button. You can search for existing contacts or input a new number manually.
If you have multiple numbers attached to your user in Sonar, you can choose which number to use by clicking "Send SMS using: X (XXX) XXX-XXXX" at the bottom of the pop-up.
Pro Tip: Call from Messages!
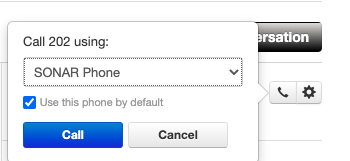
You can call a contact through your SMS chat history within the SMS chat subtab. Open an SMS chat and click the phone icon on the right side, then choose the phone in which you want to make the call.
Send Files with Sonar MMS
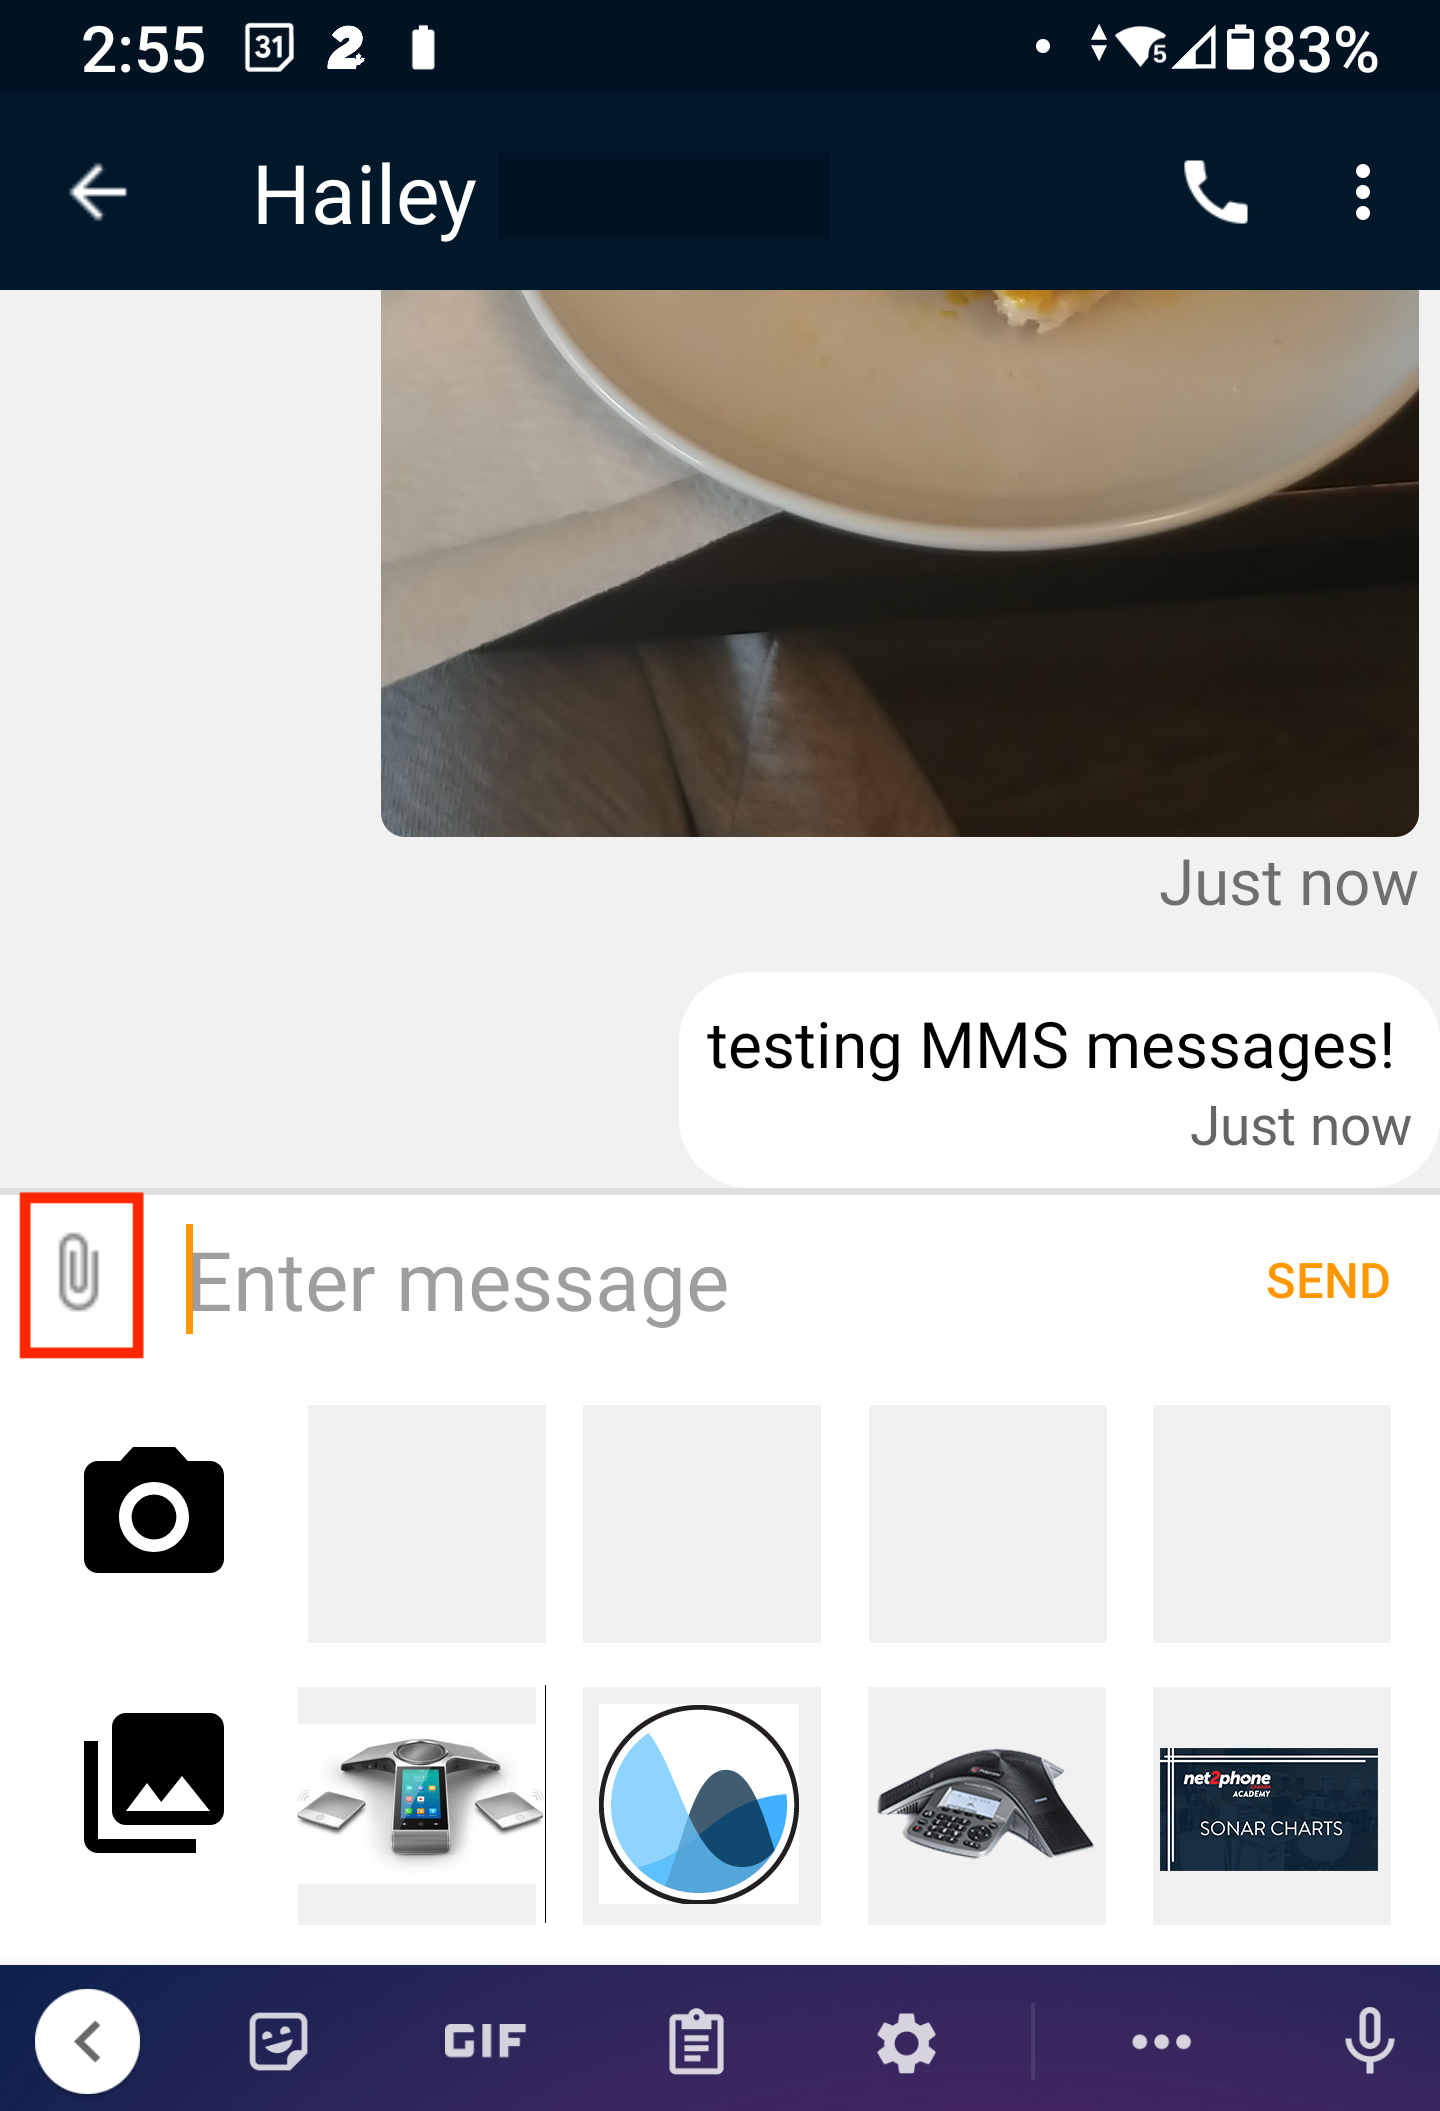
You can send MMS messages through the net2phone Canada mobile app and SONAR, which allows you to send multimedia files, longer messages (up to 1600 characters from 160), and have group conversations. To use MMS, ensure the application can access your camera and photos for MMS messages. To send a picture, press the attachment icon on the left side and either: take a new photo or choose a saved picture.
SMS and MMS Call Queue Notes
Send MMS Messages from Sonar Desktop
- Log into SONAR with your net2phone Canada credentials. Office managers and call center supervisors must be in My Account view to access the Messages tab.
- Click the Messages tab.
- Click the Chat and SMS subtab.
- Open a conversation, and click the paper clip icon to attach a file.
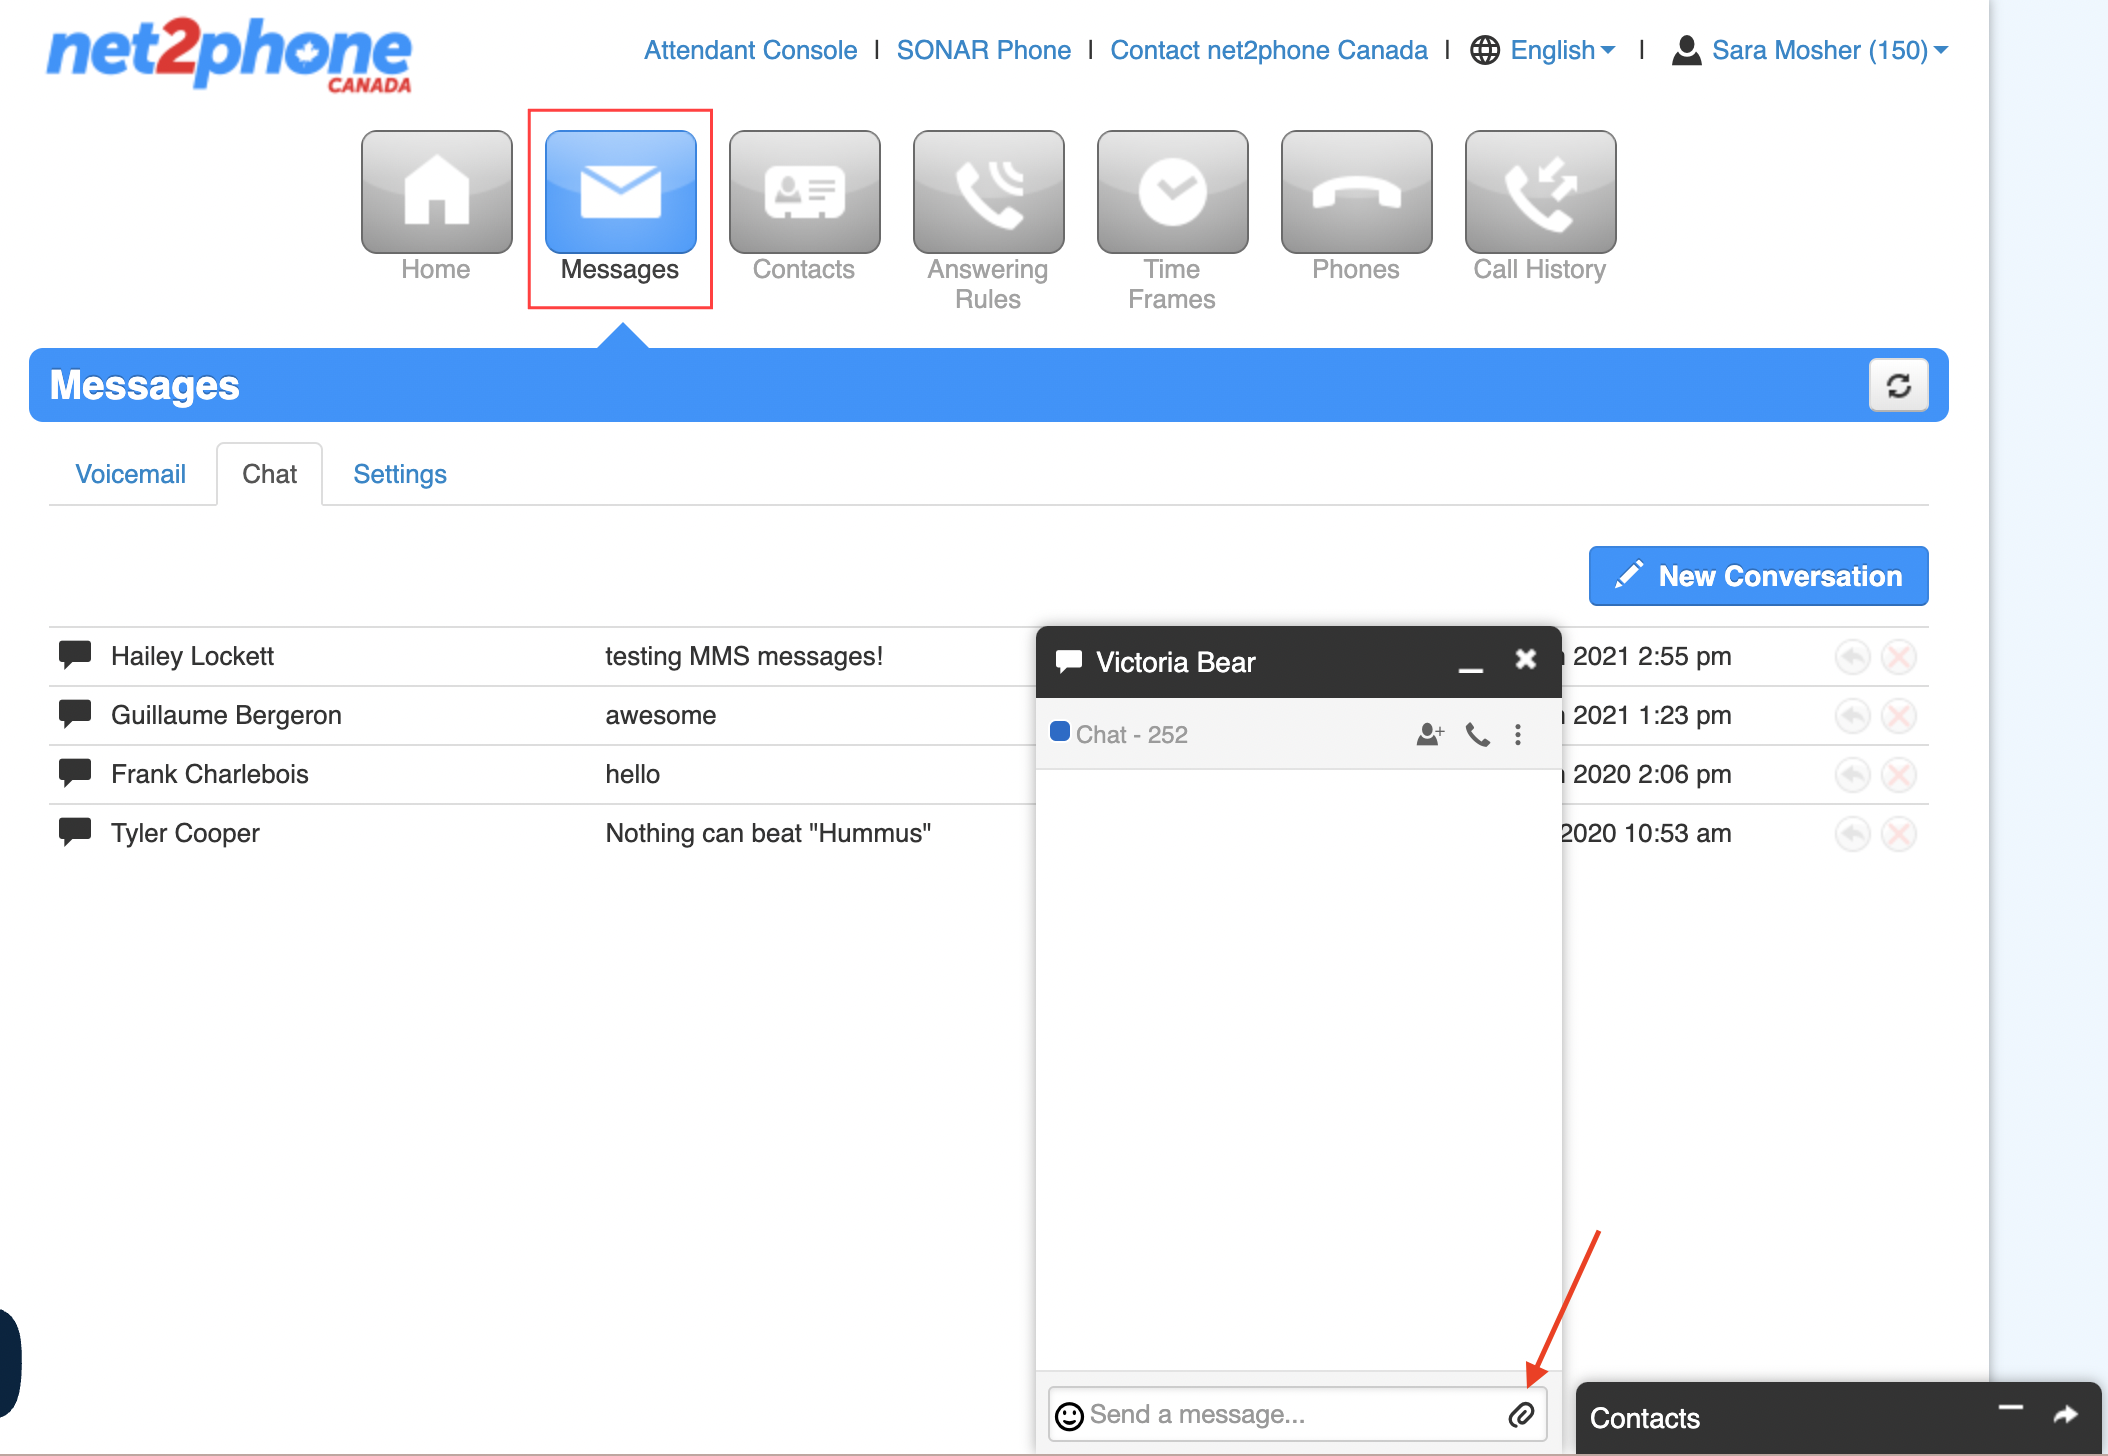
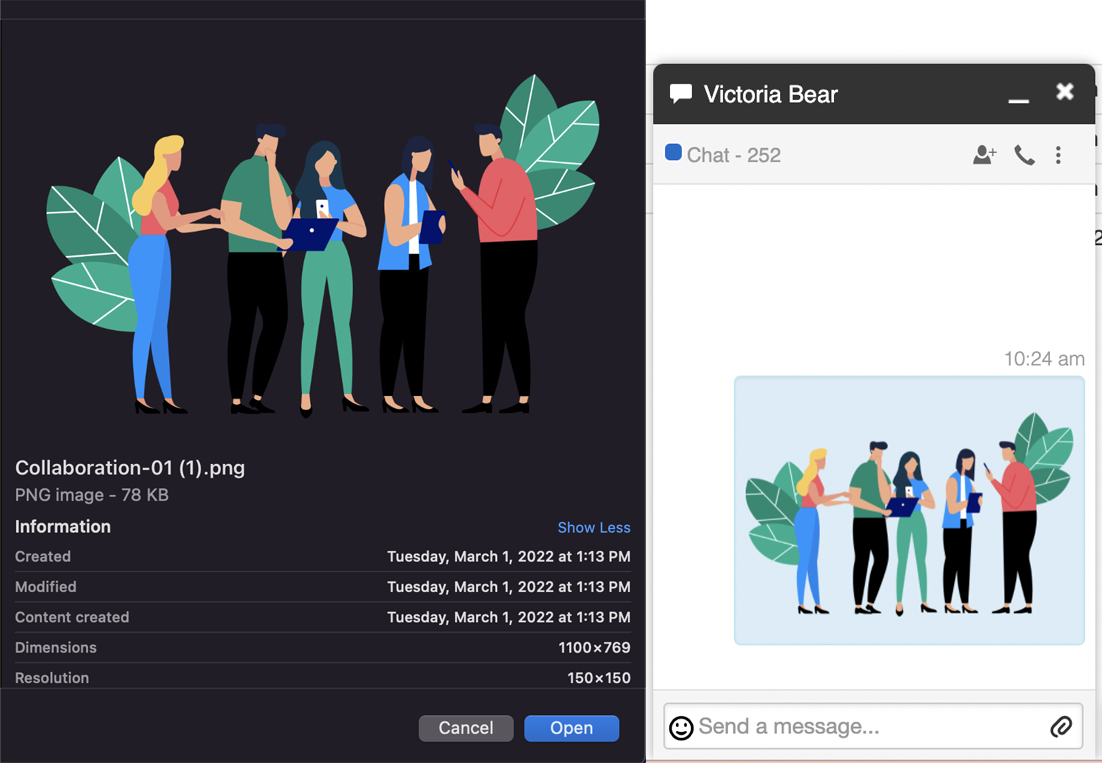
- Browse for the photo you want to send, and click open/ok.
Send MMS Messages from Sonar Mobile
MMS messages do not work when messaging both internal and external contacts in a group conversation. You must send individual MMS messages to all intended recipients.
SMS Call Queues
SMS for call queues works similarly to normal call queues; if you are an agent in a call queue with SMS enabled, you will receive a queue-SMS request through your Sonar portal.
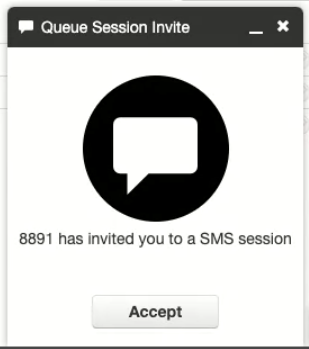
Once you have accepted the request, you see the enter-queue keyword at the beginning of the conversation.
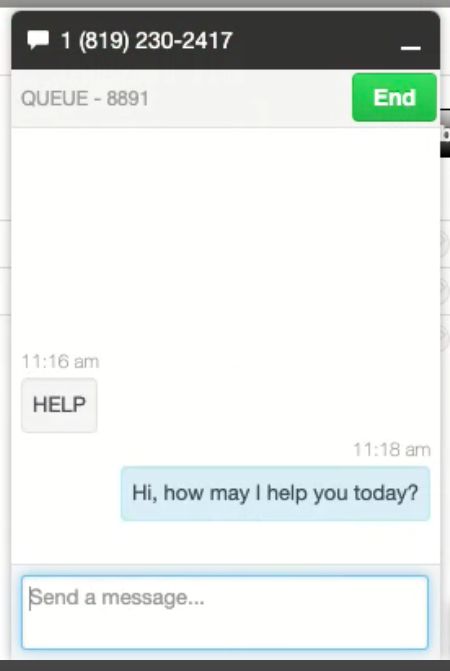
The same functionality as depicted above applies; however; at any point, you or the sender can end the chat. The sender can end the chat by using the queue keyword designated by your office manager or call center supervisor. You can end the chat by clicking the End button in the top right corner of the chat. If you (or the sender) have ended the chat and you want to send another message or view the history, you must go through the Messages tab.
SMS Call Queue Notes
Setup your Audio Directory
Record Your Name For Auto Attendant Directory
If your company uses an auto attendant directory, you'll need to record your name. Adding your recorded name—even with text-to-speech—allows callers to find your extension quickly.
How To Record Your Name for Your Company Directory
All Sonar users have a Messages tab; Office Managers and Call Center Supervisors must be in My Account to access the Messages tab. Follow these steps to record your name so callers can find you in the company directory:
- Click on the Messages tab in your Sonar portal.
- Click on the Settings subtab.
-
Under the Greetings section, click the speaker icon next to Recorded Name.
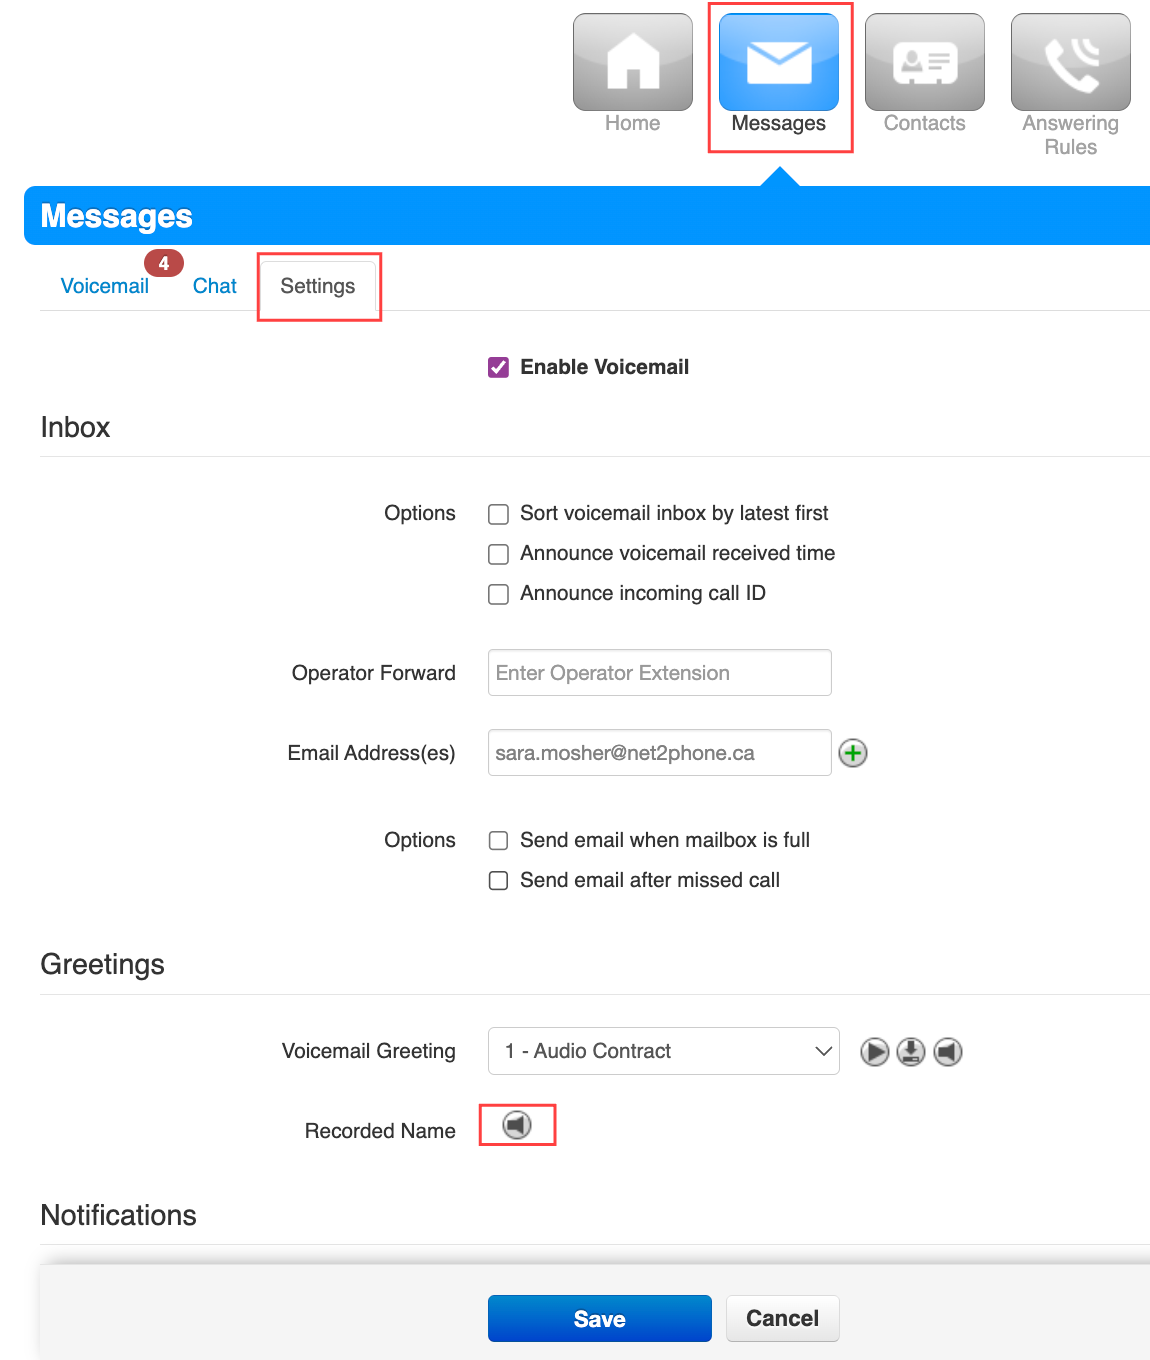
- Select Record.
-
Enter the number or extension you want to record your name on.
If you are entering an external phone number, it must be 10 digits with no spaces, dashes, or brackets (e.g., 3211234321)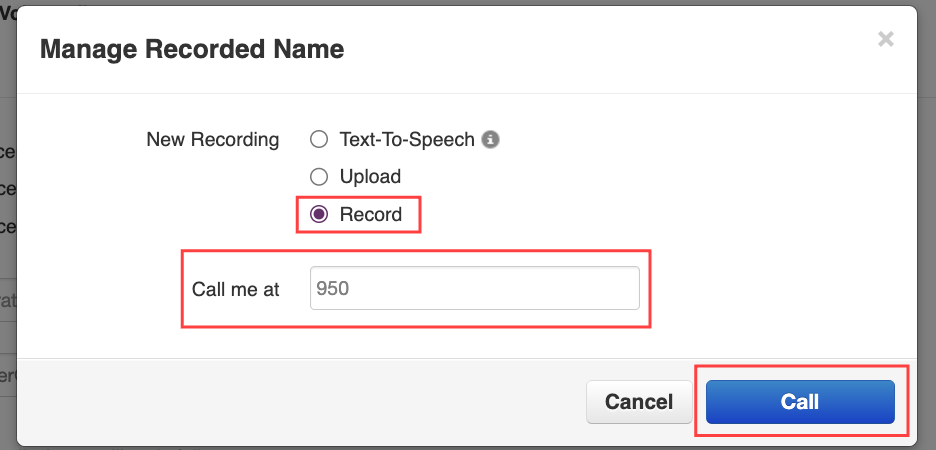
-
Click the Call button and follow the voice prompts.
- Record your message after the beep.
- Hit # to accept your new greeting.
-
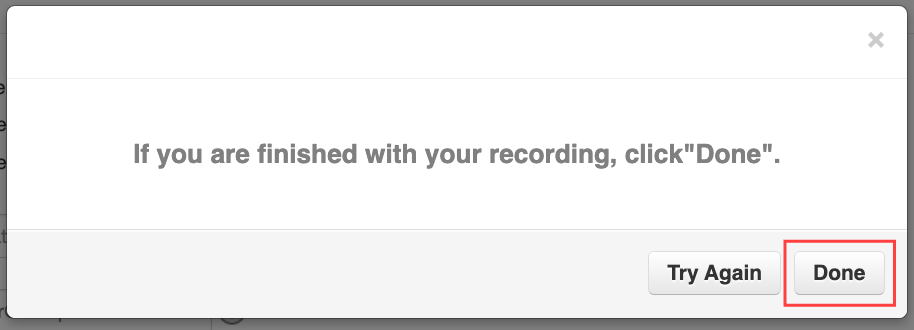
Click the Done button to save.
How to Use Text-To-Speech for your Company Directory
- Click on the Messages tab in your Sonar portal.
- Click on the Settings tab.
-
Under the Greetings section, click the speaker icon next to "Recorded Name."

- Click the radio button for Text-to-Speech.
-
Enter your message, choose English or French, and your preferred voice.
Click the play button beside the Voice drop-down menu to hear the message.
- Click Save.
Pro Tip: Test your New Directory Option!
Test your company directory name by calling into your business line and following your auto attendant!
Sonar Contacts for Internal Communications
Sonar Contacts
Learn how to access your contacts, add contacts, and utilize Sonar Chat for internal communications. You can locate your contact list in the Contact tab of your Sonar portal or the bottom pop-up on the right side.
Accessing your Sonar Contacts
Office managers and call center supervisors must be in My Account to access their contact list.
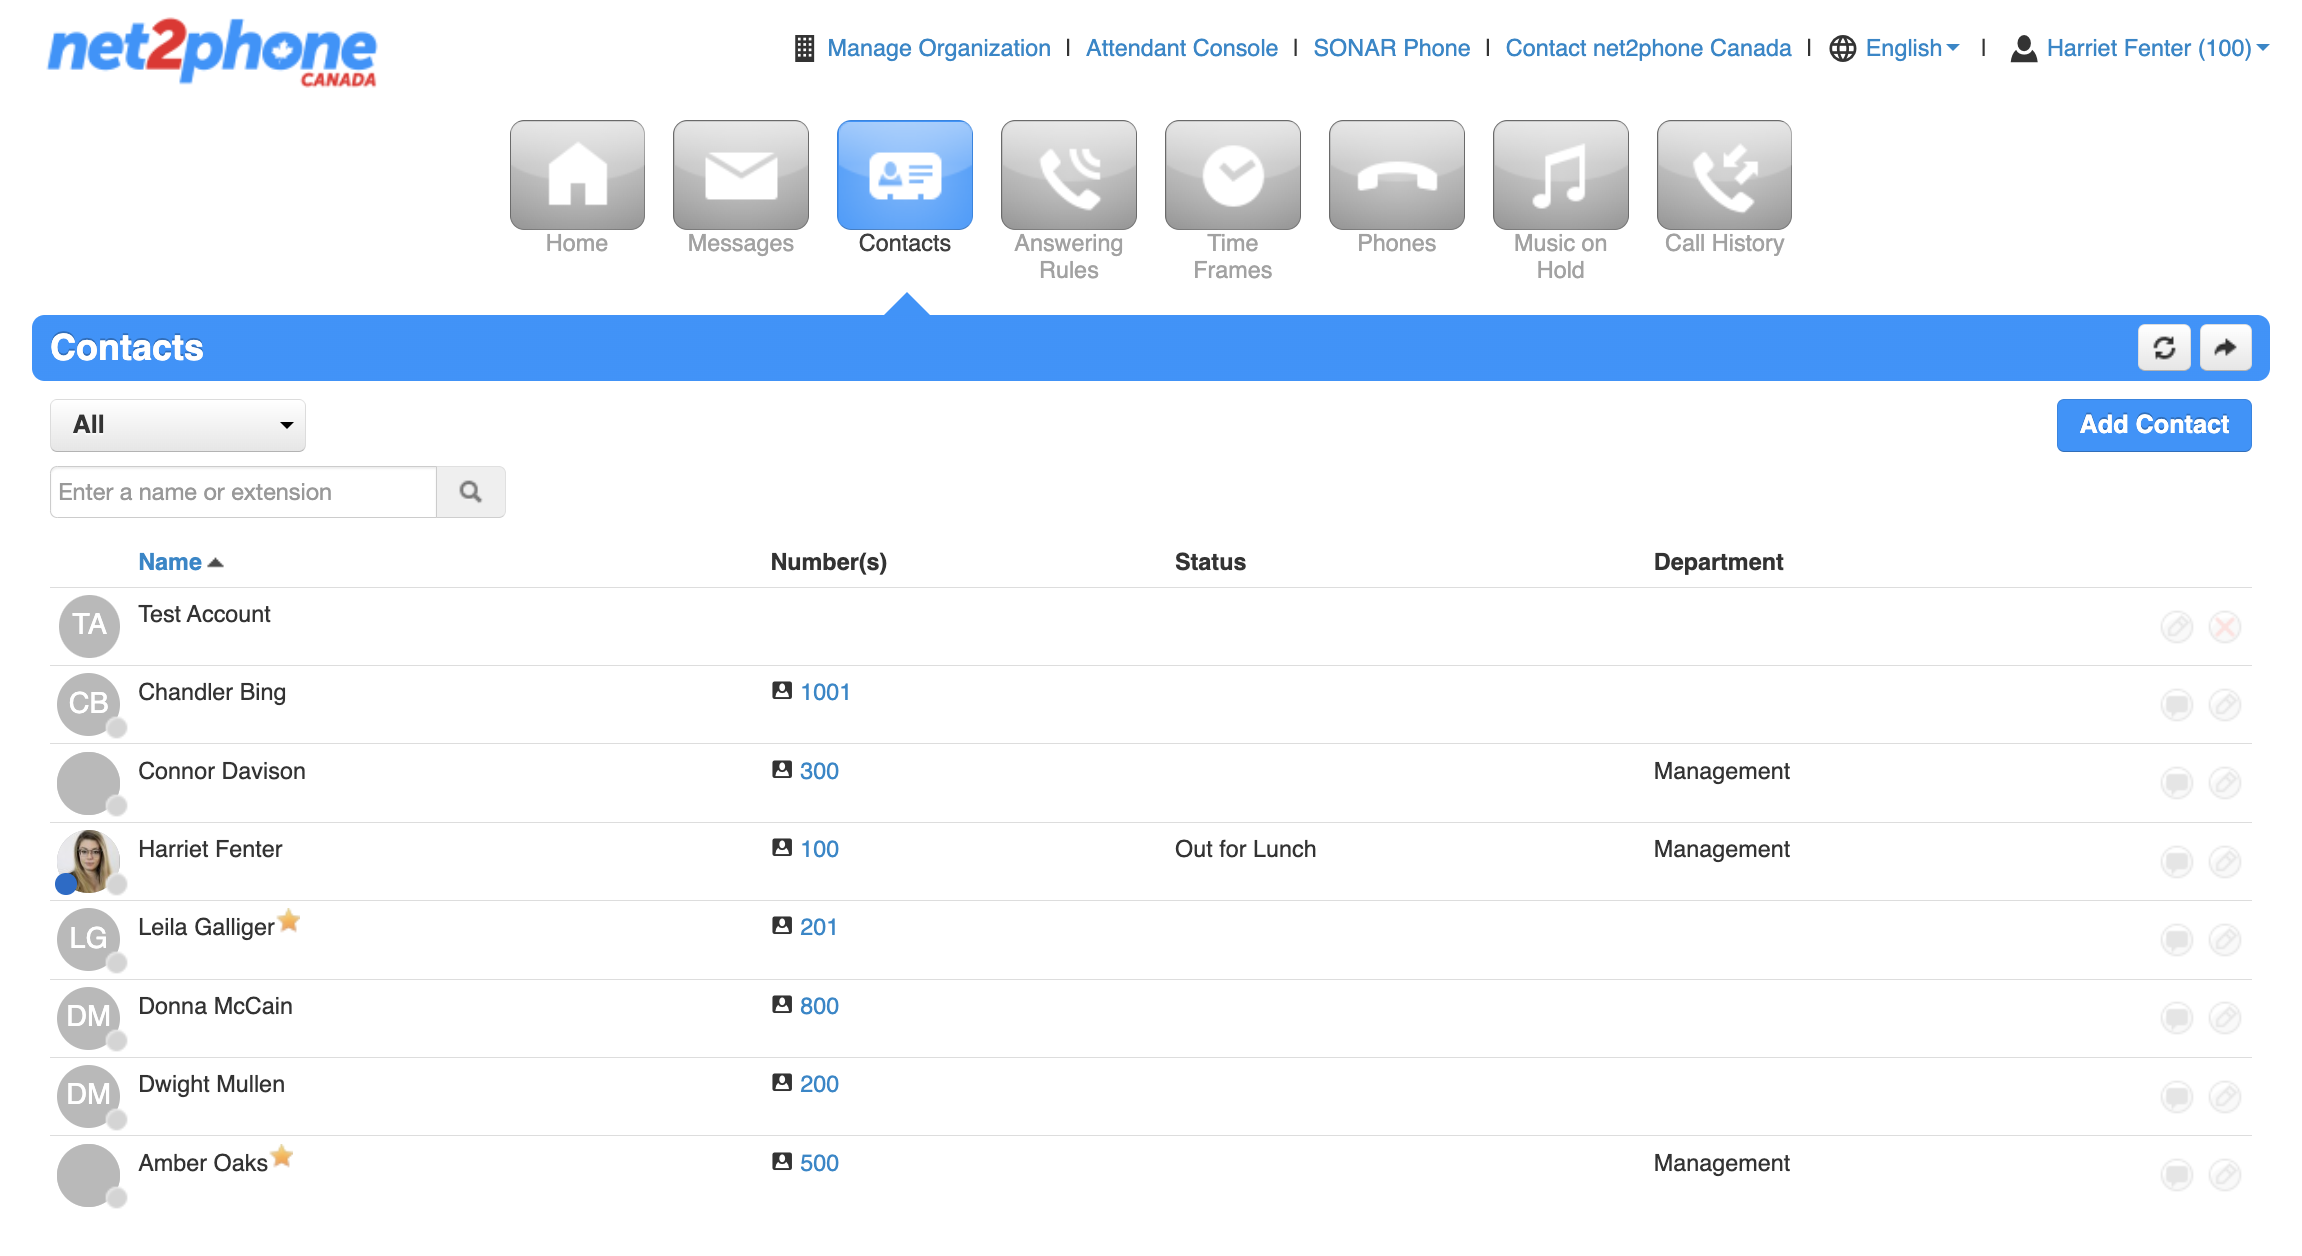
Under the Contacts tab, you can easily access all of your contacts. Your contacts are displayed by name, phone number/extension number, status (online/offline), and department.
Search and Filter your Contact List
You can search for a contact using their name or extension and filter contacts using the drop-down menu.
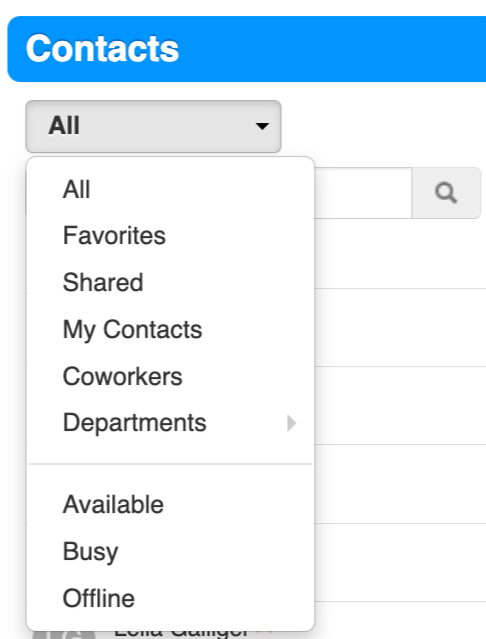
Starred contacts  are saved as your “favourites.”

Add Personal Contacts to Sonar
All employees within your organization are automatically listed as contacts in your Sonar portal.
Sonar Resync After Reboot
The Sonar system is directly linked to your desk phone, so if you manually add contacts to your device, they will be deleted if the device is reset or rebooted.
How to Add a Contact in the Sonar Portal
If you would like to add external contacts to your Sonar account, follow the steps below.
- Log in to Sonar using your net2phone Canada credentials.
Office Managers, Site Managers, and Call Center Supervisors must be in My Account to access their Contacts tab. - Click the Contacts tab.
- Click the Add Contact button.

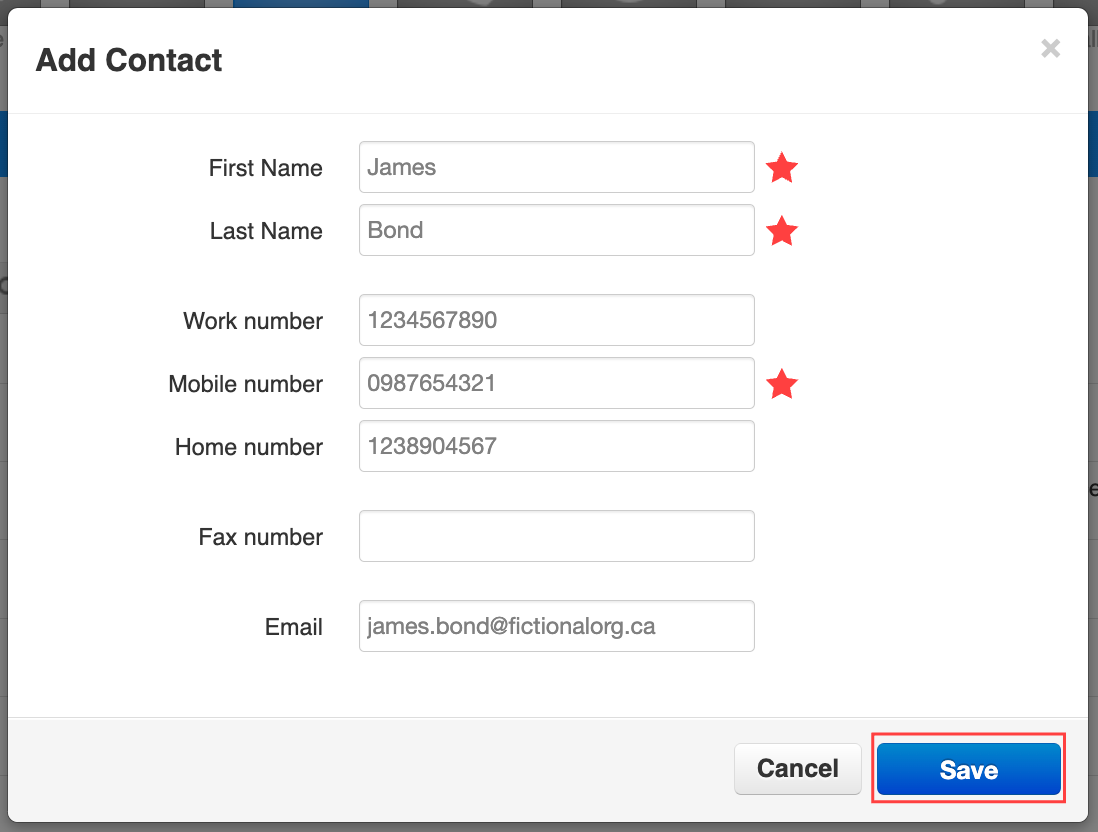
- Fill in the contact fields.
You must include a first and last name, and at least one phone number. - Click Save.
Pop-Up Contacts for Sonar Chat
Sonar Chat Internal Messaging
Sonar Chat allows you to send instant messages to internal contacts within the Sonar portal.
Filter your Sonar Contacts
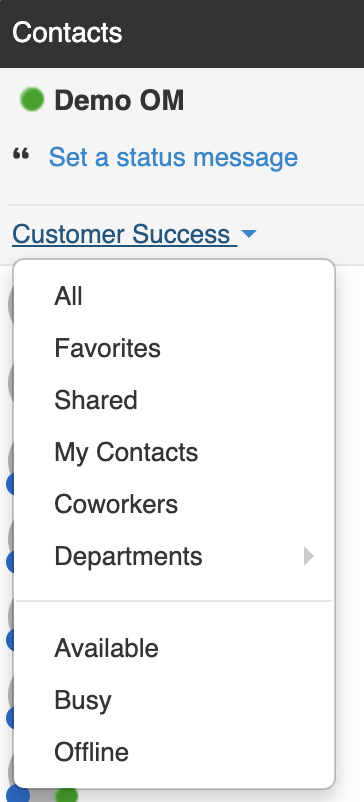
You can search for a contact by their name or extension number, or filter for specific groups of contacts using the drop-down menus.
 |
|
View Past Message Threads
Toggle from Contacts to Recents to view a list of your past Message threads.

Start a New Sonar Chat
Start an internal chat with a few clicks!
- From any page of the Sonar Client Portal, click the Contacts popup menu in the bottom right.
- Select your desired contact. or start a new message thread by clicking the Message icon.
- Type your message and use the Enter/Return key to send.

File Sharing over Sonar Chat
You can instantly send and receive documents during an IM chat.
- Open the chat window.
- Click the paperclip icon in the bottom menu to upload a file from your computer.
Alternatively, you can simply drag and drop a file into the chat window to share it.

Delete a Conversation
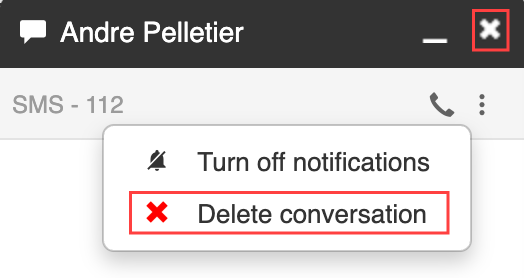
Close a conversation without deleting the thread history, simply click the "x" in the corner. To delete a thread's history, follow the steps below.
- Click the 3-dot kebab menu to open more options.
- Click Delete conversation.
Change your Status from Sonar Chat
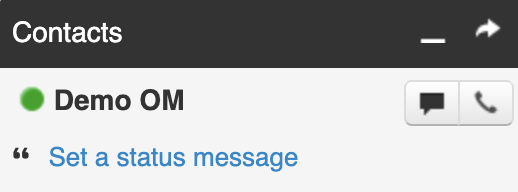
You can easily change your status from the Sonar Chat, which is located under your name at the top of the popup window.
Success: View Chats in your Messages tab.
Office managers and call center supervisors must be in My Account to access the Messages tab of the Sonar portal.
You can view your internal message history along with your SMS history in the Chat sub-tab.

Call Forwarding with Answering Rules and Time Frames
Sonar Time Frames are the foundation of call-answering customization. When used in conjunction with Answering Rule options, you can choose how your phones are answered based on a specific date range, day, and time.
Forward Calls to an External Number
Forwarding Calls to an External Number
Working from home today? Learn how to forward your business calls to your mobile or landline phone. If you have multiple external numbers you may need to be reached at, take advantage of the When Unanswered forwarding option to add another device and never miss a call.
Warning: High-Volume Incoming Calls Forwarded to Mobile Numbers
Forwarding multiple incoming calls to a mobile number may result in some calls going directly to voicemail. If several calls are forwarded simultaneously, your mobile provider may not support this high volume, causing the calls to be routed to net2phone Canada voicemail.
How to Send Calls to an External Number
Identify your Time Frame First!
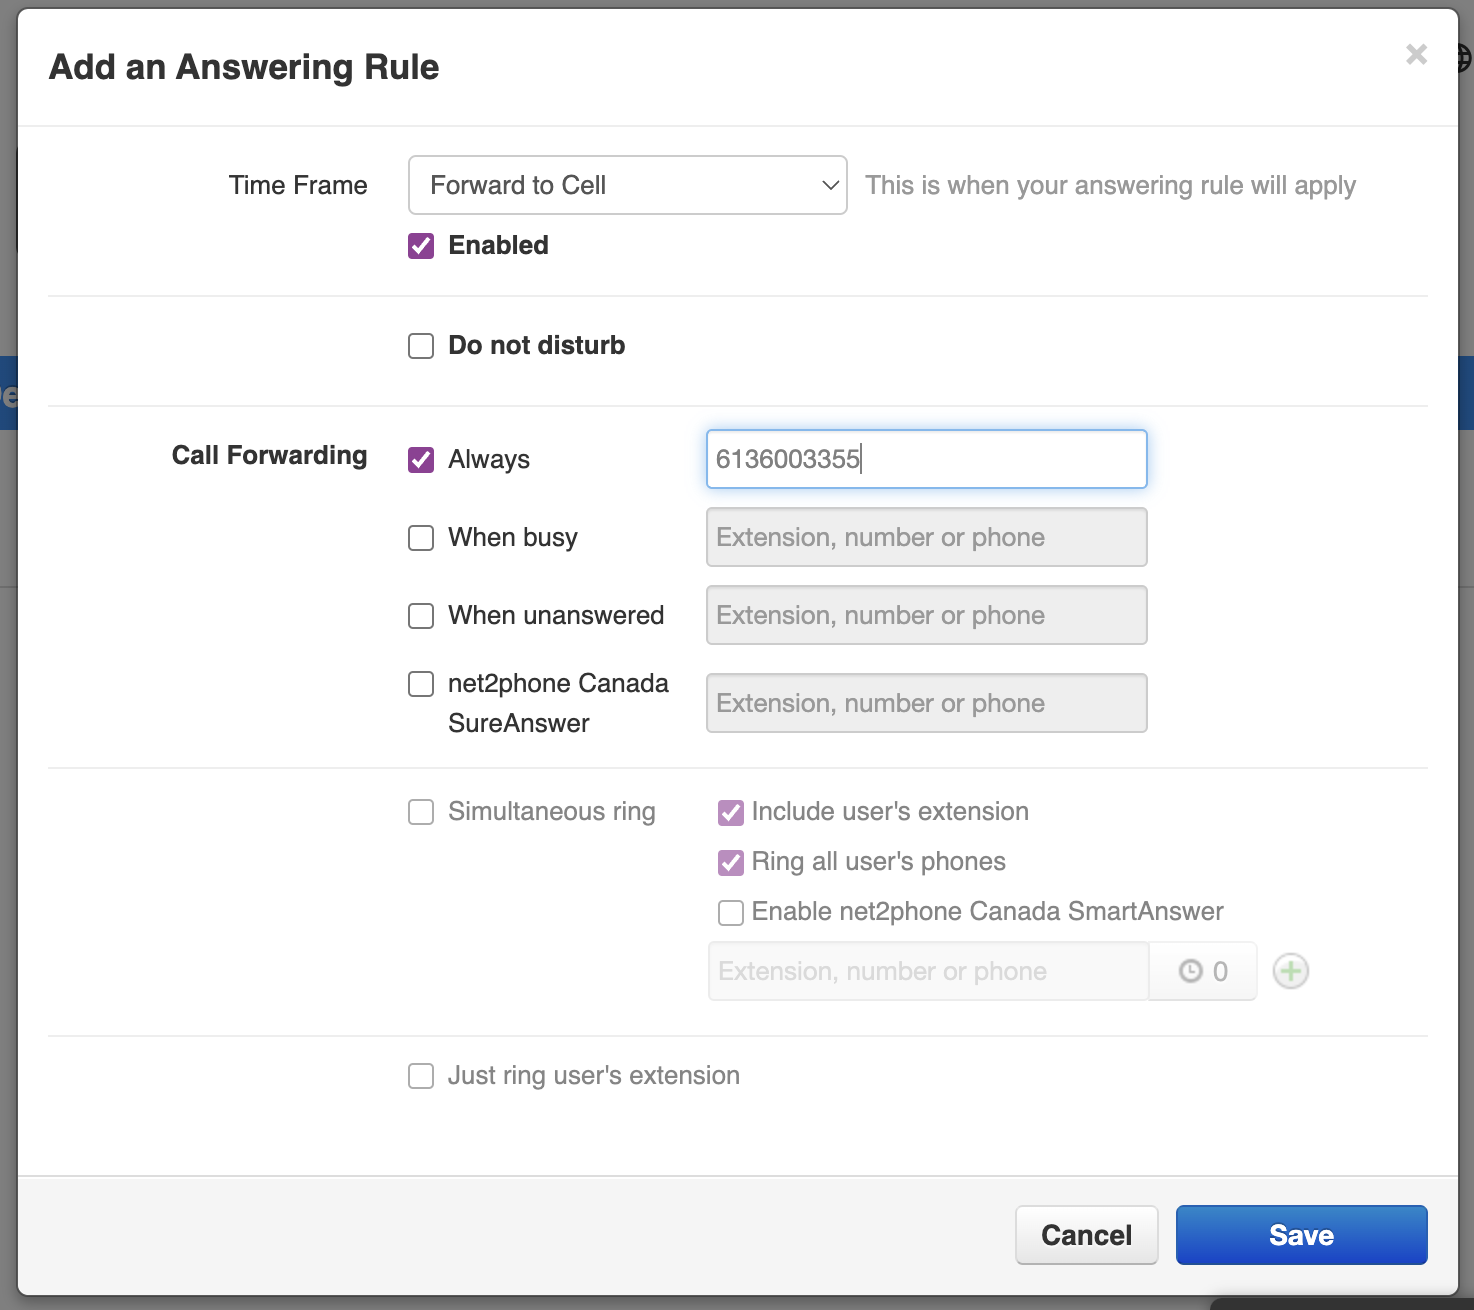
Every answering rule must be linked to a time frame. The example below uses an Always Time Frame with Always Forward.
If you do not have a time frame to link your answering rule with, you must create a new one.
View the Original Caller ID or your Company Caller ID!
Differentiate personal calls from work calls when forwarding to a personal device.
Enter a 10-digit number to forward the original caller ID of the caller.
For example: If you enter 6132379329
Enter an 11-digit number to forward your company's caller ID.
For Example: 16132379329
Office Managers and Call Center Supervisors must be in My Account to access their answering rules.
- Click on the Answering Rules tab in your Sonar portal.
- Click the Add Rule button to create a new rule, or the pencil icon to edit your active rule.

- Under the Call Forwarding section, click the checkbox next to Always.
- In the entry box next to one of the options, (1) Always, (2) When Busy, or (3) When unanswered, enter a phone number without spaces or dashes. Phone numbers must be 10 or 11 digits without spaces, dashes, or brackets (e.g., 6131234567 or 16131234567).
- Click Save.
- Ensure your new rule is at the top of the Answering Rules list for the highest priority. Drag-and-drop your Answering Rule to the top if needed.

Call Forwarding: Video Walkthrough
Pro tips!
- Forwarding to a mobile phone? Check out our Sonar Mobile: User Guide.
- The net2phone Canada SmartAnswer feature is an alternative to call forwarding that allows you to screen your business calls on your mobile device as well as ensure your callers always reach your net2phone Canada voicemail. Login to Sonar and follow this tutorial to Enable Sonar SmartAnswer.
- Ensure that you never miss a call in case of a power outage using Enable Sonar SureAnswer for Outage Backup.
Prepare to be Out of the Office
Set Up Your Phone To Be Out-of-Office (OOO)
If you're taking some time off work it's a good idea to let your clients know you'll be gone or have your calls forwarded to a different extension. Whether you're going to be out of the office (OOO) for 1 day or an extended period of time, it's good practice to keep as many people in the loop as you can.
Need more detailed instructions?
Check out the Time Frames Overview to learn more about how time frames work.
If you want to learn more about how each Answering Rule works, check out the Answering Rules Overview.
Check out our dedicated article for full instructions on how to create a new voicemail greeting.
Create an Out-of-Office Time Frame
Office managers and call center supervisors must be in My Account to access their Time Frames, Answering Rule, and Messages tabs.
- Navigate to the Time Frame tab of your Sonar portal.
- Click the name of the time frame you want to edit or click Add Time Frame on the right side.

- Select one of the three types of time frames:
- Always
- Days of the week and Times
- Specific dates or ranges
We recommend using specific dates and ranges for an OOO time frame; that way, you only have to set it once, and it will automatically time out, whereas always, the days of the week and times must be changed manually.
The Default Time Frame
Specific dates and ranges will automatically adjust your default time frame around the range you set. If you reopen it and notice there are more "ranges," don't worry, it is the system's way of ensuring your time frame works with your default the way it was intended.
The default time frame is used whenever you don't have a specific time frame set. For example, if your work-week time frame is set from 9:00 a.m. to 5:00 p.m., Monday to Friday, the default time frame will be active outside of those hours—meaning from 5:01 p.m. to 8:59 a.m. on weekdays and all day on weekends. When creating answering rules, keep in mind that if no time frame is set, the default message will be played.

For Specific Dates and Ranges
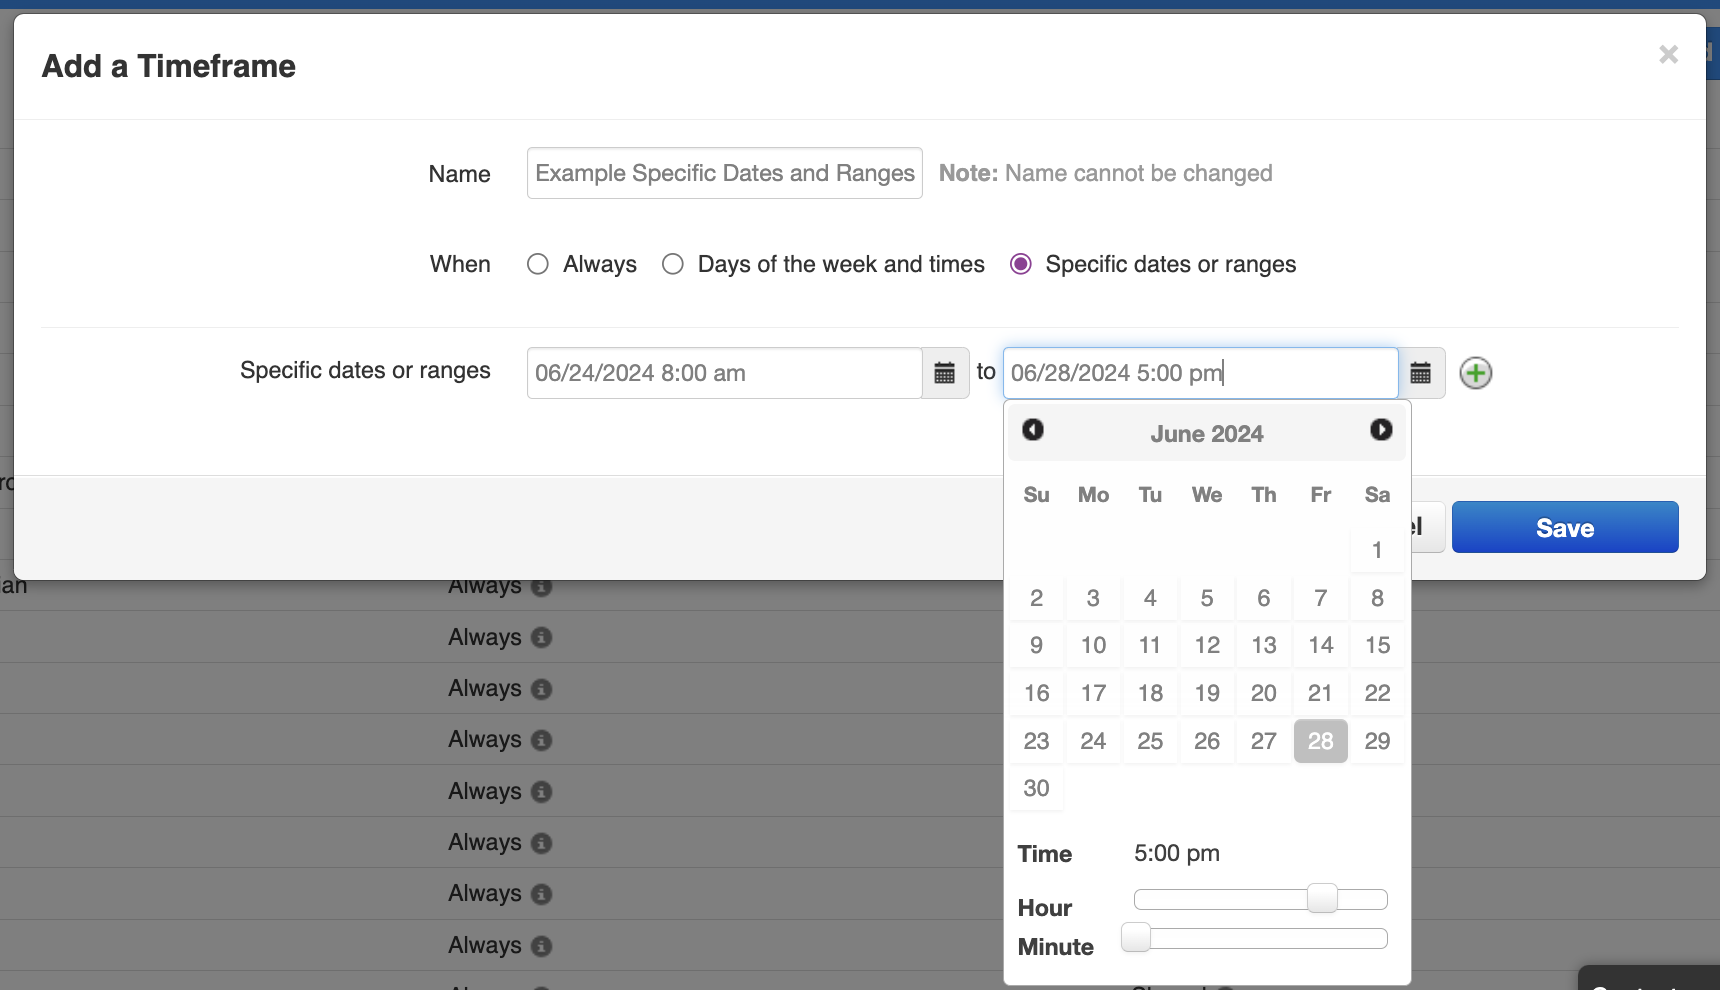
Select Specific days or ranges whenever you need a special behavior for full days such as holidays or sick leave.
- Click the calendar icon
 and select your time frame's start and end dates.
 - If you wish to add multiple start and end dates, click the green plus icon on the right side.
- Click the Save button.
Create an Out-of-Office Answering Rule
Once your time frame is ready to go you're ready to set your answering rule.
- Navigate to the Answering Rules tab of your Sonar portal.
- Click the name of the answering rule you want to edit, or click Add Rule on the right side.
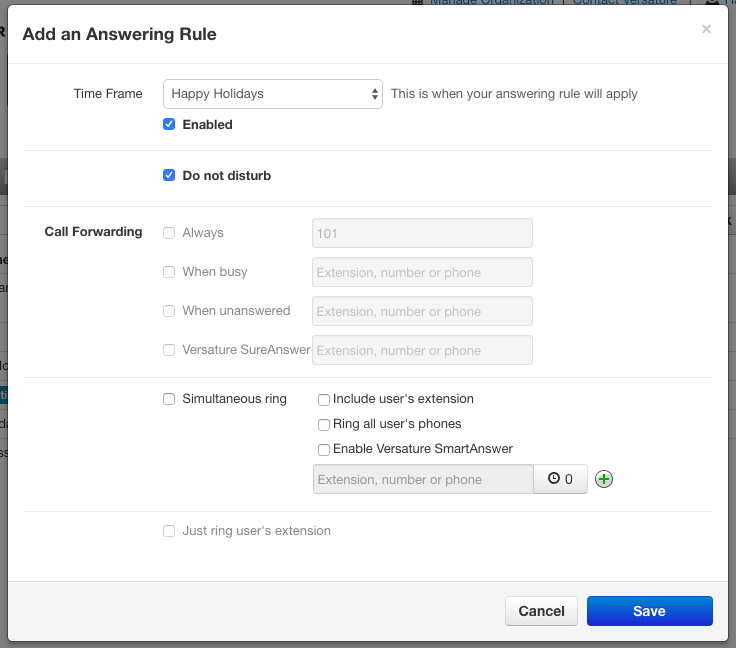
- Choose the answering rules you want for your time away. The example below displays Do not Disturb enabled, so calls will be sent to voicemail. Notice how if you have Do not Disturb enabled, you cannot also click any of the other options.
Update your Voicemail
It's always a good idea to have an out-of-office voicemail at hand in case you need it. If you know in advance you're going away for a holiday or vacation, you can let people know when you'll be back. Since you are not limited to the number of voicemail greetings you can keep on file, we also recommend a generic OOO greeting for those last-minute sick days.
- Navigate to the Messages tab of your Sonar portal.
- Click the Settings at the top.
- Under "Greetings" click the speaker icon to "Manage" your greetings.

- In the pop-up window that appears, click Add Greeting at the bottom.
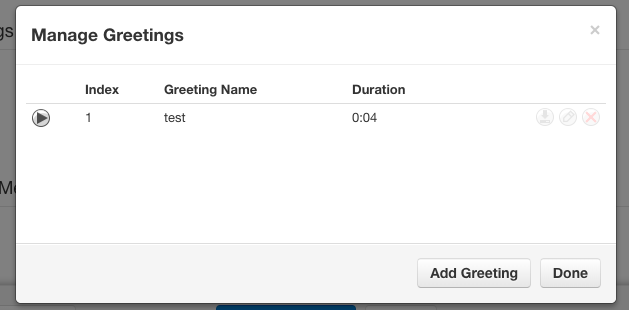
- You can create a voicemail greeting in three ways:
- upload an existing .wav or .mp3 file,
- record a new greeting, and,
- use text-to-speech to generate a voicemail greeting.
Uploads must be in .wav or .mp3 file formats. If you want to record your message on a non-Net2phone Canada device, you must enter a 10-digit number without dashes, spaces, or brackets.
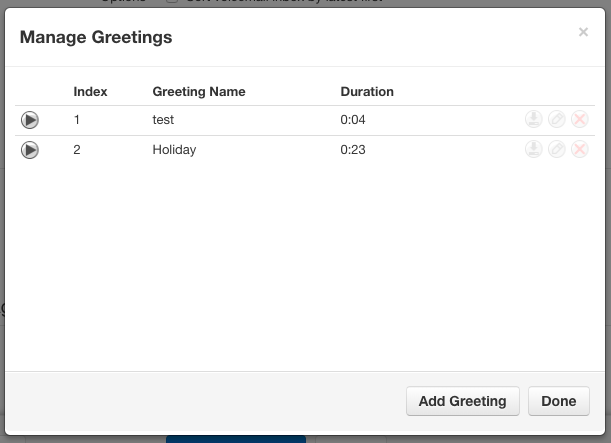
Once your upload or recording is properly saved, you will be brought back to the previous pop-up window, and you will see your new greeting in the list.
6. Click Done to save.
Activate your voicemail greeting!
If you want to activate your new greeting, in the Messages, Settings section, under Greetings, click the drop-down menu and select your new greeting.

Always remember to Save at the bottom of the Messages tab before exiting the page!

Access, Filter, and Export your Personal Call History
With these step-by-step instructions, you can view, filter, and export your call history, making it easy to track and manage your calling habits.
Access your Call History
Office Managers and Call Center Supervisors must be in My Account view to access their personal call history log.
- Log in to the Sonar portal with your net2phone Canada Credentials.
- Click the Call History tab.

Navigating Your Call History
If your Call History log exceeds 15 entries, you can navigate through the pages by clicking the page numbers at the bottom or using the arrow buttons. Alternatively, you can expand the number of call logs displayed per page. To view more calls per page, click “25,” “50,” or “100” in the bottom right corner.

 Incoming Calls
  Outbound Calls
  Missed Calls
To navigate through pages, either click the page numbers at the bottom or scroll through with the arrow buttons.

Populating your call history can take time, resist the urge to click more than once.
Filter your Call History
Populating your call history can take time, please resist the urge to click more than once.
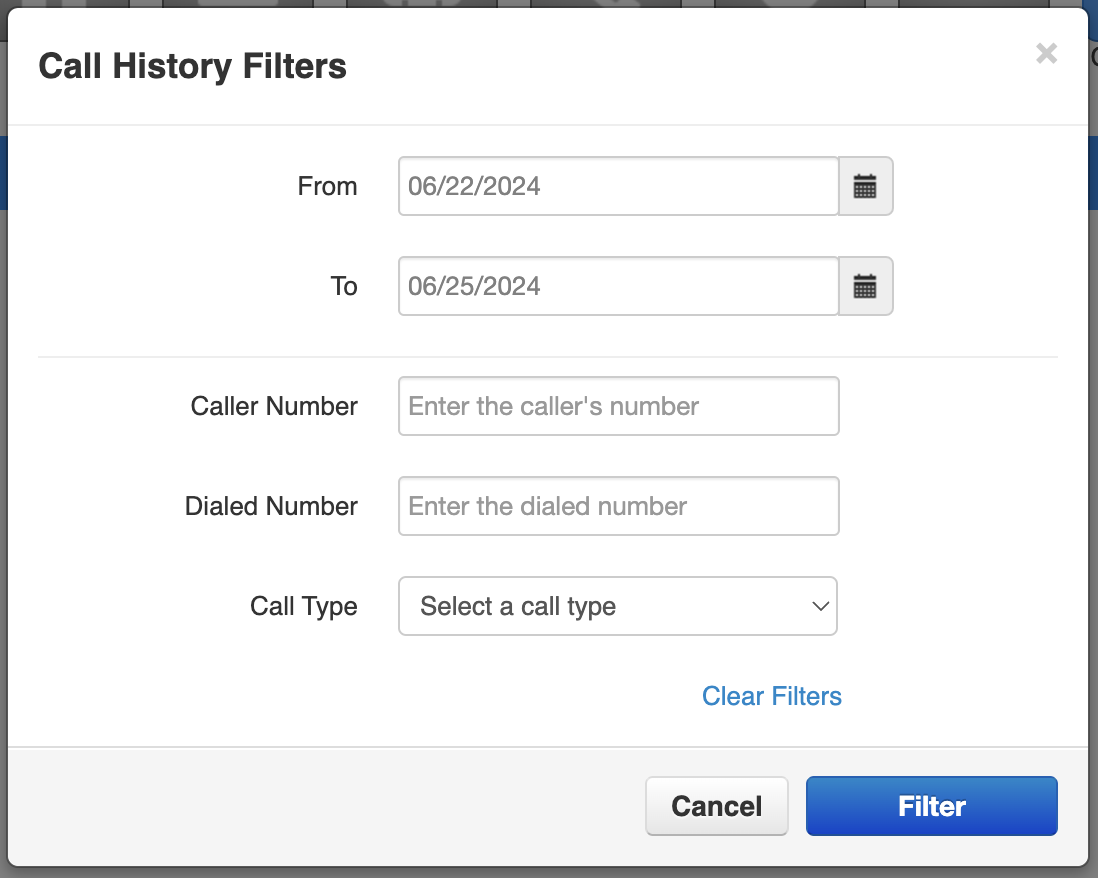
- Click on the Filters button on the left side.
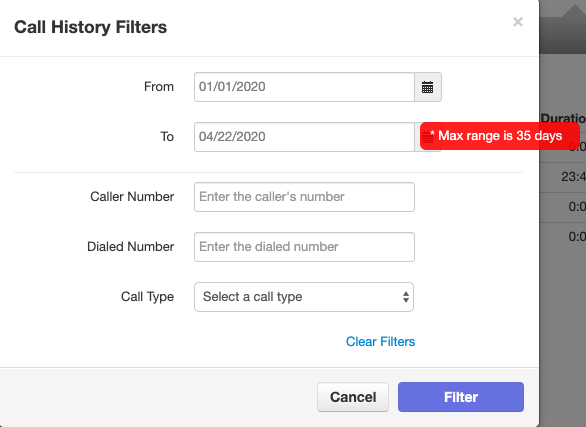
- You can filter your call logs using:
-
The date range (From-To) – refine your search by entering a specific time range using the “from” and “to” calendars. The maximum range is 35 days.
- Caller number – refine your search by entering a specific caller’s number.
- Dialed number– refine your search by entering a specific outbound number., and,
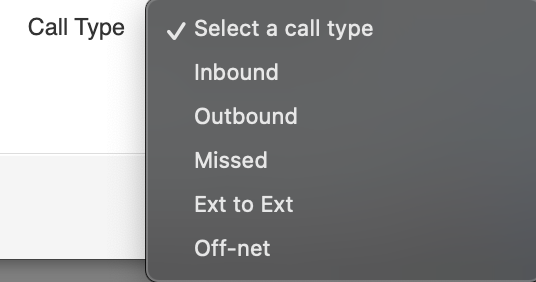
- the drop-down menu for Call type – refine your search by selecting a call types:
- inbound (to you),
- outbound (from you),
- missed (sent to voicemail),
- ext to ext (internal calls), and
-
off-net (external calls).
-
The date range (From-To) – refine your search by entering a specific time range using the “from” and “to” calendars. The maximum range is 35 days.
- Click Filter to save and see your results.
Export your Call History
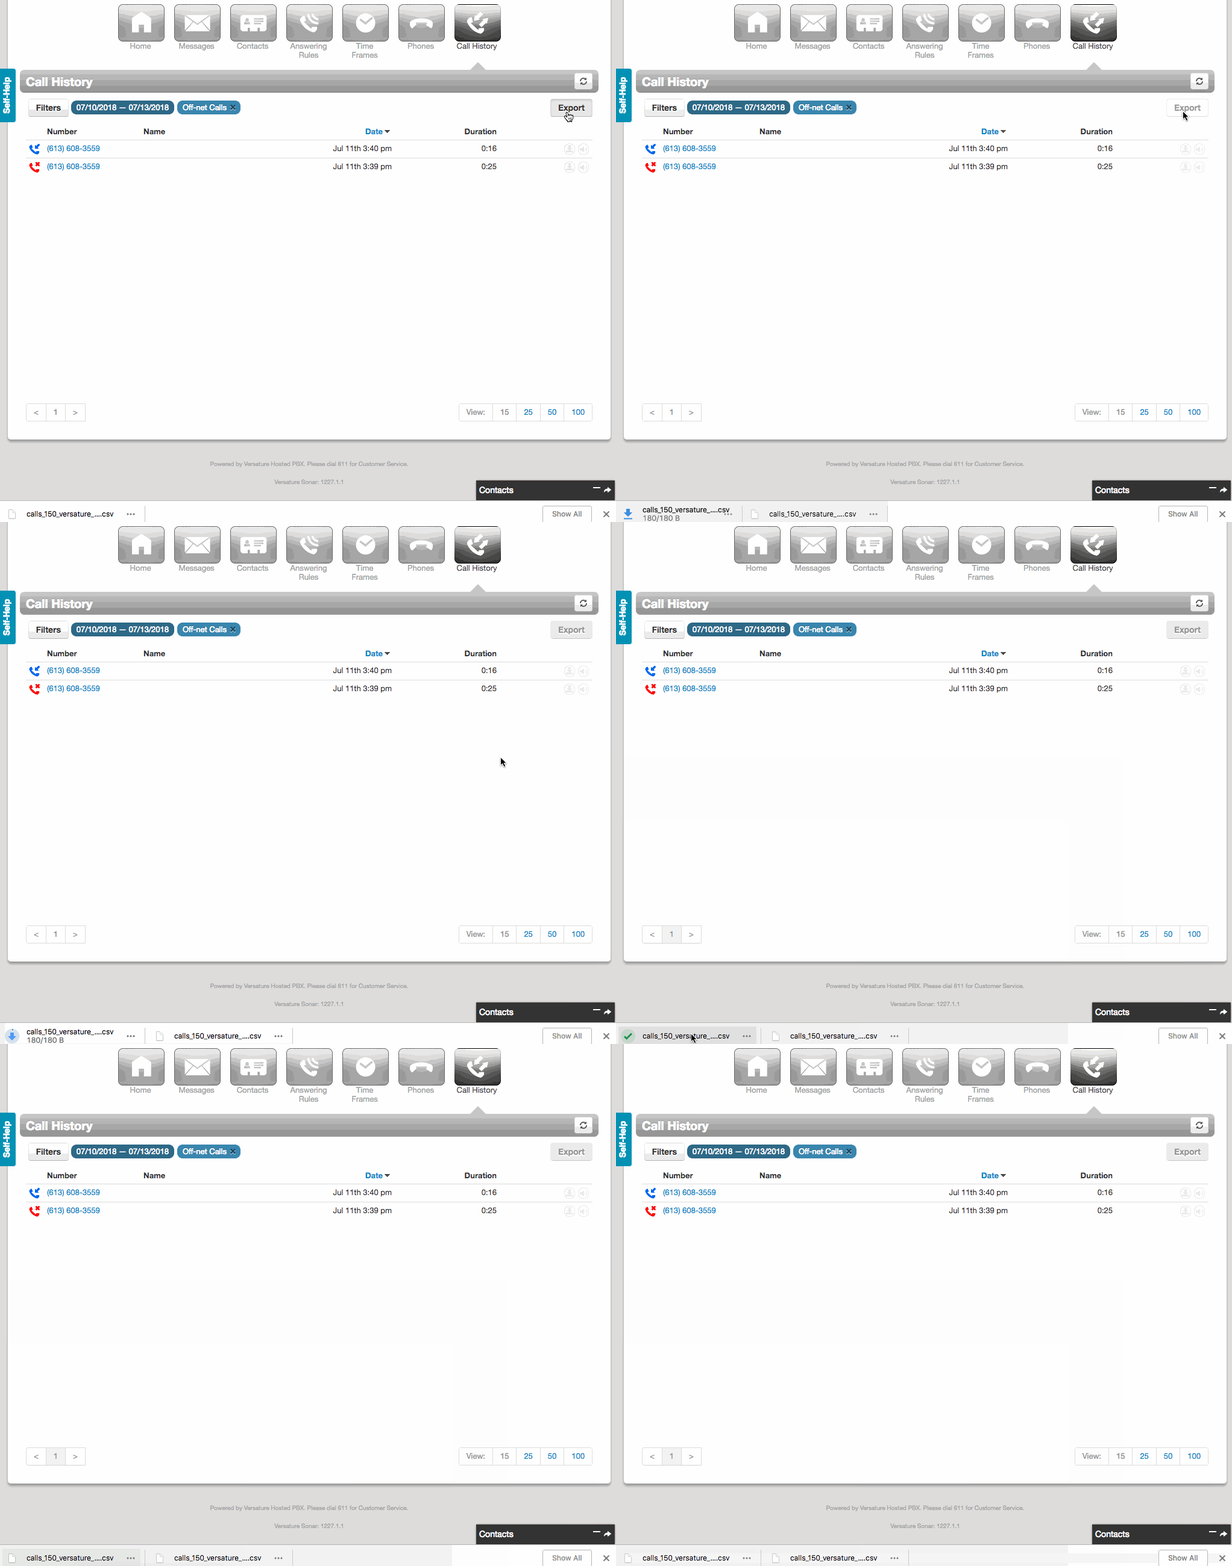
Please be patient; the export may take a few seconds to appear.
- Click the Export button on the right side.
- Click on the .csv file that appears in the download section of your web browser.
Reading a Call History Export
The exported call history will be displayed in a table like the image below.
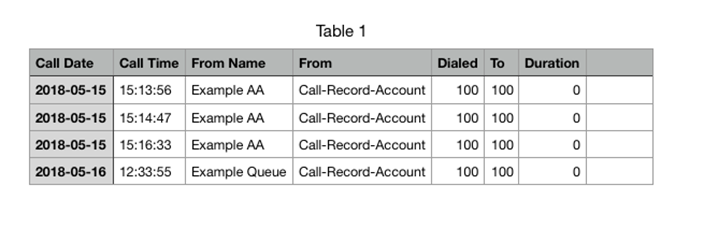
After exporting, you might notice some different labels within the "To:" column field.
- VMail – indicates a call reached its ring timeout and a voicemail message was initiated.
- SpeakAccount – indicates that the caller hung up during a voice prompt. For instance, a caller dials his co-worker, but his co-worker does not answer. The voicemail prompt begins to play, but before it has finished, the caller hangs up.
- System – indicates that the Caller hung up while in an Auto-Attendant.
